You’ve just unpacked your shiny new MacBook, and suddenly everything looks different.
The familiar Windows landscape has vanished, replaced by sleek icons, a mysterious dock, and gestures that seem like secret handshakes.
Your muscle memory from years of Windows clicks and keyboard shortcuts feels useless. That moment of tech confusion is totally normal.
This post is your guide, crafted specifically for Windows users staring at their Mac, feeling excitement and mild panic.
Whether you’re a professional switching work machines or a creative exploring a new digital playground, this post will replace the initial confusion with confidence.
Key Takeaways
- Windows users feel completely new to macOS.
- Expensive machines become frustratingly complicated.
- Systematic learning turns confusion into confident navigation.
#1 User Interface Navigation
macOS is designed for creators. A few things are unique and valuable for anyone using the OS. However, for first-time users, there can be several instances in which beginners might feel overwhelmed.
Let’s explore it one by one.
#1.1 Menu bar location and functionality
The menu bar sits permanently across the top of the screen, always displaying context-specific options for the active application.
Unlike Windows, where menus are attached to individual windows, macOS features a unified menu bar that changes dynamically based on the current app.
The Apple menu on the far left provides system-level controls, while the right side hosts system status icons like Wi-Fi, battery, and clock.

#1.2 Dock vs Windows Taskbar
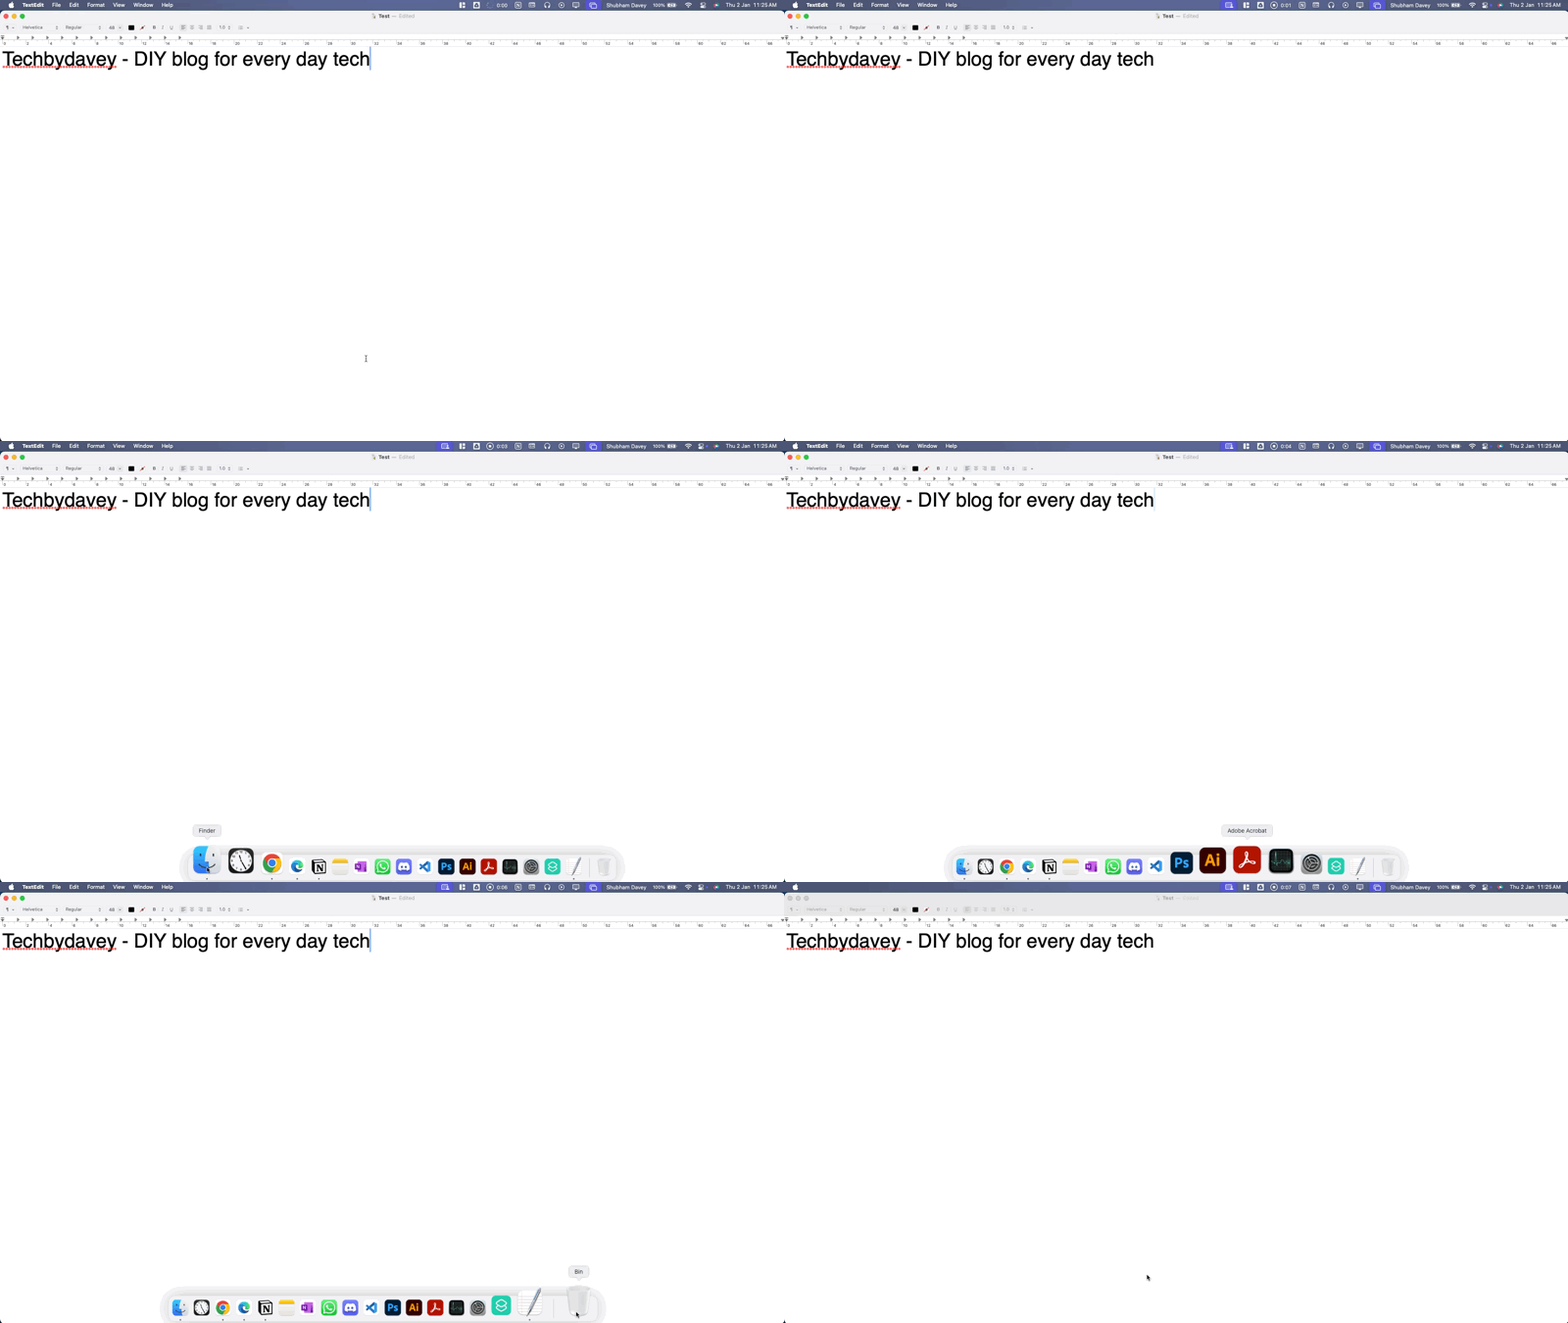
The Mac Dock differs significantly from the Windows taskbar. While both serve app launching and management functions, the Mac Dock is more visually dynamic with mouse-over magnification and easy icon repositioning.
However, a key frustration for Windows users is that clicking a Dock icon doesn’t always open the app window – Mac is document-based, meaning you might only see the app’s menu.
#1.3 Finder as the file management system
Finder is Mac’s default file management system, allowing users to view, access, and organize almost everything.
Key features include:
- Multiple view options like list and gallery
- Customizable sidebar for quick access to folders
- Ability to create smart folders based on search queries
- Preview pane for quick file inspection (press the spacebar to preview the selected file)
#1.4 Mission Control and Stage Manager for Window Management
Mission Control enables seamless app and desktop switching with gesture-based navigation. You can create multiple desktops, organize windows, and enter full-screen modes.
Stage Manager, introduced in macOS Ventura, offers a fresh window organization approach.
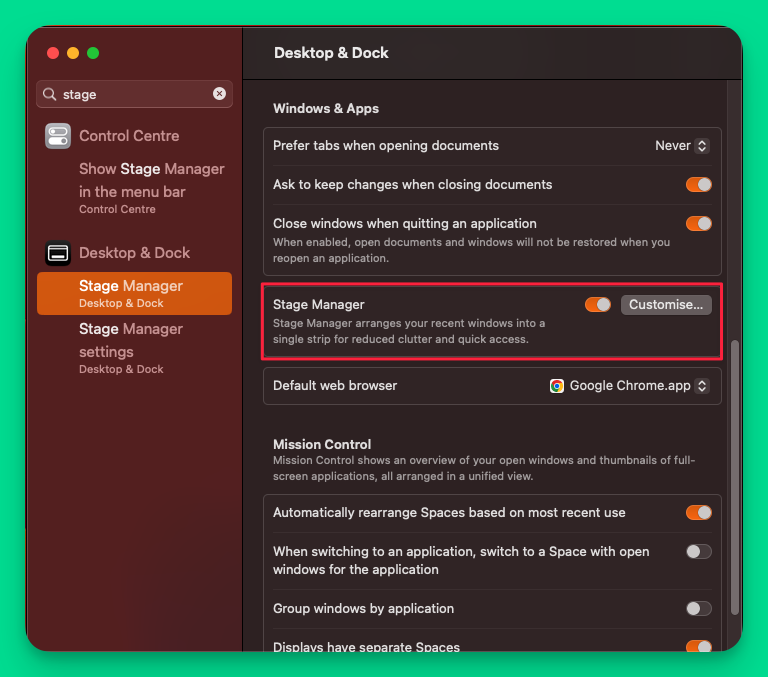
Stage Manager:
- Groups windows from the same app
- Minimizes distractions by focusing on one window
- Allows easy window rearrangement between app sets
#2 Keyboard Shortcuts
The most significant change I had to deal with was adapting to command. It didn’t take long, and now, when I use Windows, my muscle memory looks for the command key.
Instead of command+tab, I press windows+tab, which opens the standard application switcher, but the application windows can be seen. You can also create alternate desktops.
But that’s not what I wanted to do.
Here are some Windows shortcuts you must’ve used the most and what it means on macOS:
- The Command key replaces the Control key
- Control+C for copy becomes Command+C, paste becomes Command+V
- Switching between apps (Command+Tab)
- Quitting apps (Command+Q) – Clicking on the red cross doesn’t close the application. It just closes the window, but the app still runs in the background.
- Closing the active window (Command+W) (Option+Command+W closes all windows of the active application. You will still have to quit the app by pressing Command+Q)
#3 Trackpad and Mouse Interactions
Your Mac’s trackpad isn’t just a pointing device—it’s a sophisticated interaction canvas that transforms how you work and play.
Unlike Windows laptops with basic click-and-scroll functionality, Mac trackpads are intelligent surfaces that respond to nuanced gestures.
Imagine navigating complex spreadsheets, editing photos, or switching between applications with subtle finger movements.
This might initially feel alien for Windows switchers, but it quickly becomes second nature. The trackpad extends your thought process, reducing unnecessary clicks and making computing feel more fluid and intuitive.
This isn’t about learning complex techniques but discovering a more natural way to interact with your computer.
#3.1 Multi-touch trackpad gestures
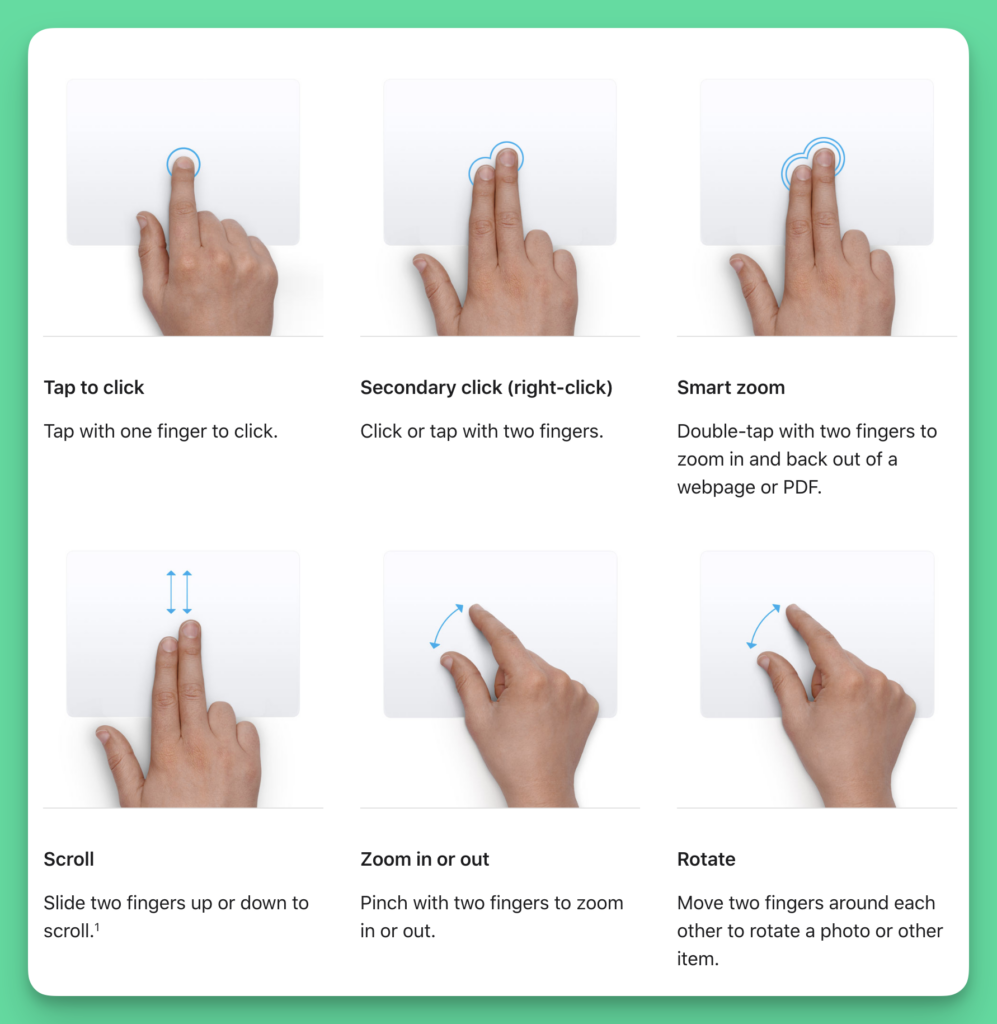
Mac trackpads are incredibly intuitive, offering 15 distinct multi-touch gestures on the trackpad & 6 multi-touch gestures on the Apple Magic mouse that transform how you interact with your computer.
These aren’t just technical features—they’re practical shortcuts that make daily computing smoother.
#3.1.1 Basic Interactions
- Single tap: Click
- Two-finger tap: Right-click
- Pinch in/out: Zoom in & out of images, webpages
- Two-finger scroll: Navigate web pages, documents
- Two-finger double-tap: Smart zoom on webpages and PDFs
#3.1.2 Advanced Workspace Management
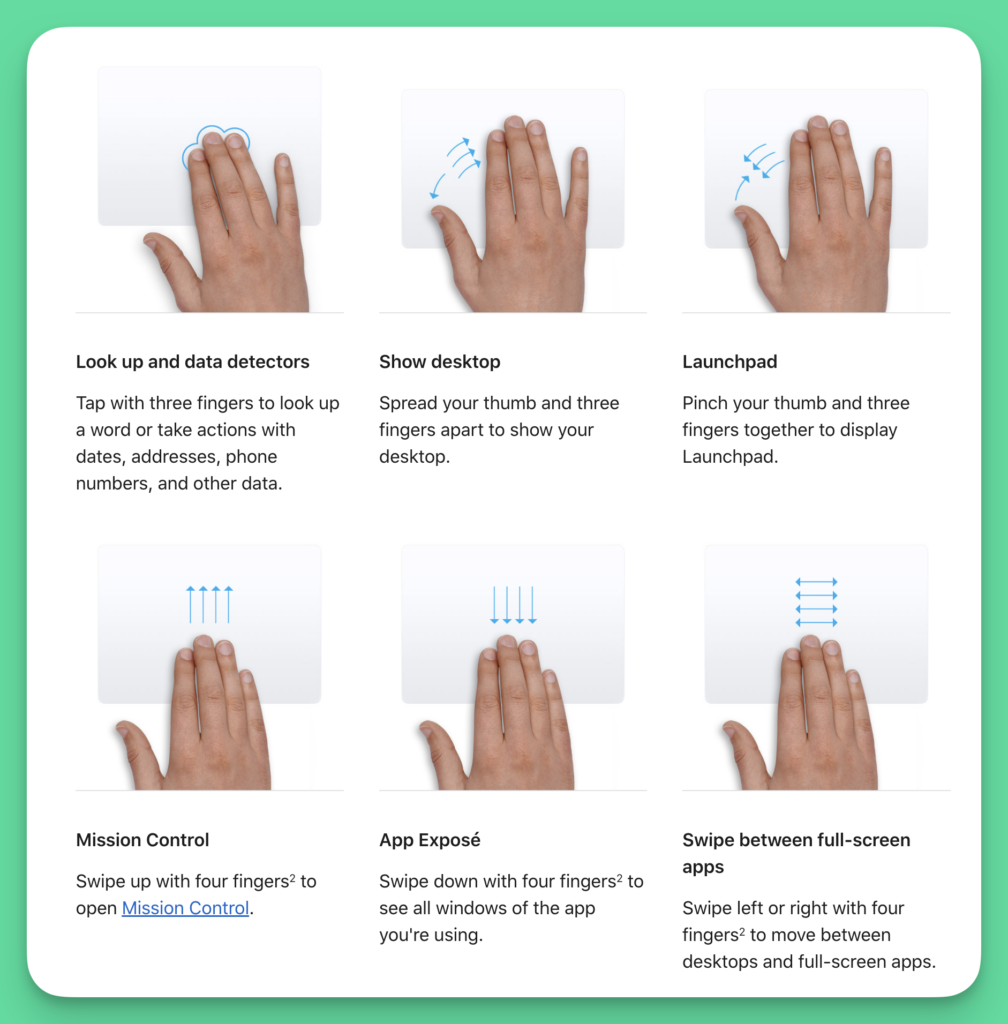
- Three-finger swipe up: Activate Mission Control
- Thumb and three fingers spread: Show Desktop instantly
- Four-finger swipe left/right: Switch between full-screen apps or Spaces
#3.2 Scrolling and navigation techniques
Scrolling is helpful in navigating across macOS & web pages. Scrolling is more than swiping on a trackpad/mouse.
Here’s how you can control the scroll
#3.2.1 Trackpad Scrolling
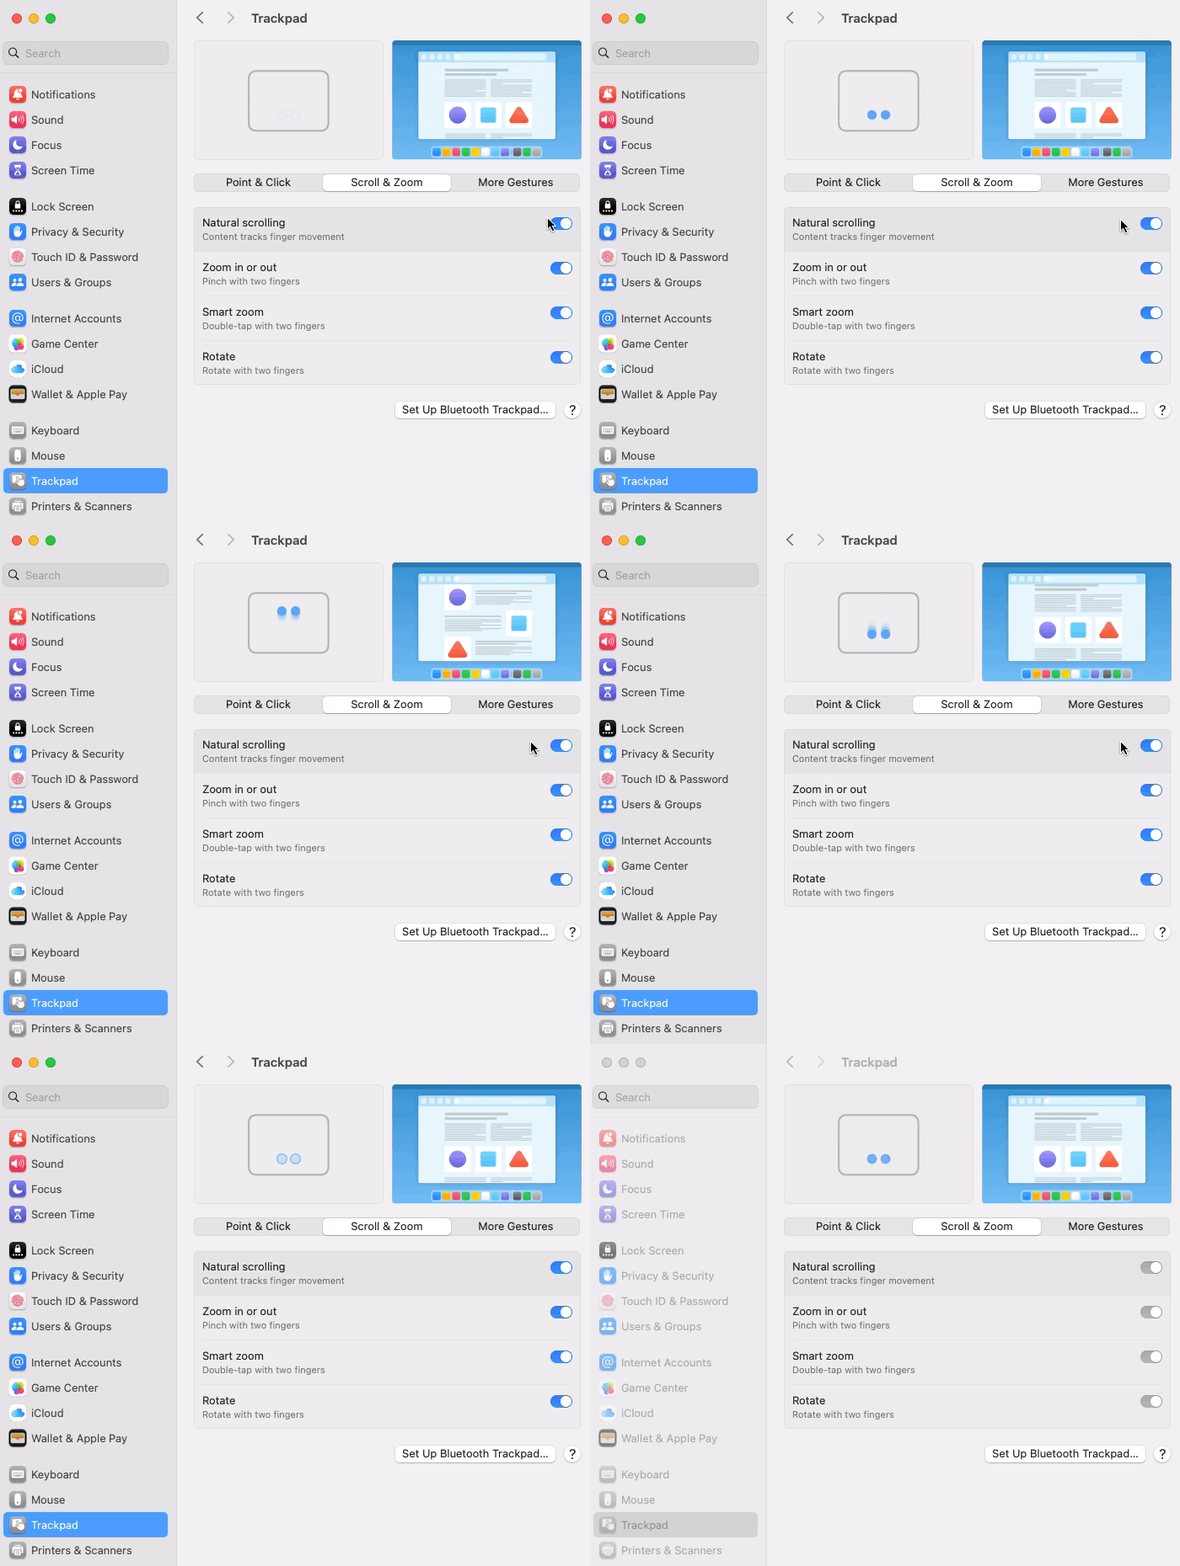
- Slide two fingers up/down to scroll through the content
- Natural scrolling mimics touchscreen behavior, moving content in the direction of your finger movement
#3.2.2 Keyboard Navigation
- Arrow keys for precise movement
- Spacebar: Scroll down one page
- Shift + Spacebar: Scroll up
- Option + arrow keys: Faster, more considerable distance scrolling
#3.3 Right-click methods (two-finger tap, Control-click)
#3.3.1 Various ways you can right-click on your Mac:
- Click with two fingers
- Two-finger tap on the trackpad
- Configurable in System Settings
- Control-click (press the Control key while clicking)
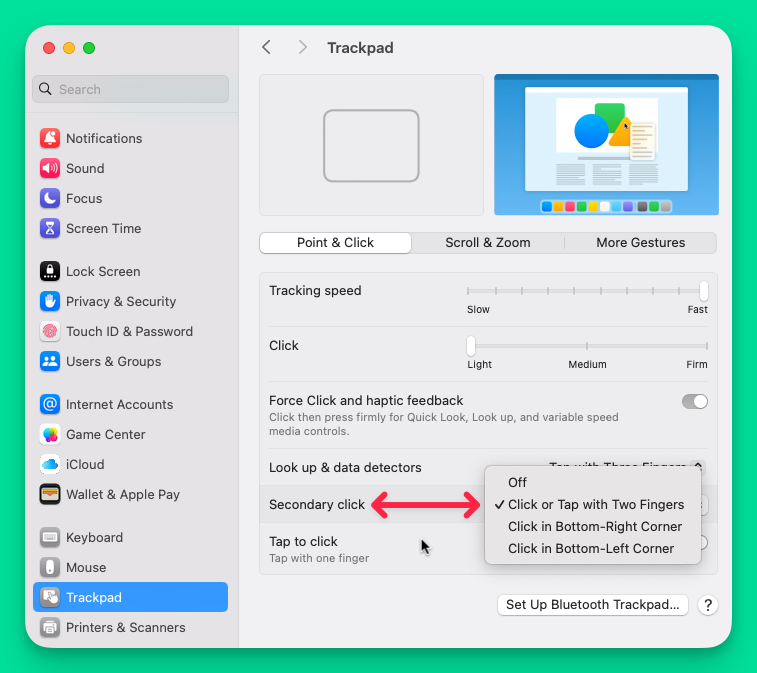
Pro Tip: You can customize these gestures in System Preferences to match your workflow perfectly.
#4 System Settings and Customization
Guide users through personalizing their Mac:
#4.1 Accessing System Settings
Mac offers multiple ways to open System Settings:
- Click Apple menu > System Settings
- Use Spotlight search (Command+Spacebar)
- Click the gear icon in the Dock
- Navigate through the Applications folder
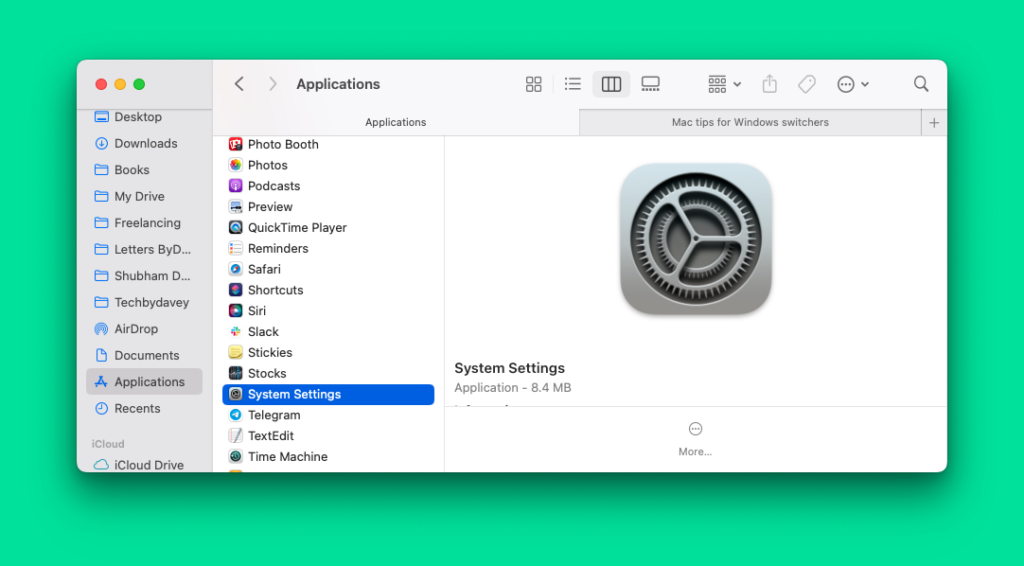
Pro Tip: Use the search field within System Settings to quickly find specific settings, saving you time and frustration
#4.2 Appearance customization
Mac allows deep personalization of your visual experience:
#4.2.1 Choose between light and dark modes
Mac offers flexible appearance modes that adapt to your environment and preferences. Dark Mode isn’t just a visual trick – it’s a functional design choice. In low-light environments like coffee shops or late-night work sessions, dark mode reduces eye strain and creates a more immersive experience.
You can configure appearance settings in three primary ways:
- Light (constant bright interface)
- Dark (constant dark interface)
- Auto (switches based on time of day)
Pro Tip: The Auto mode intelligently transitions between light and dark appearances, synchronizing with your Mac’s Night Shift schedule
#4.2.2 Customize accent and highlight colors
Mac provides eight distinct color options for customizing your interface:
- Blue (default)
- Purple
- Pink
- Red
- Orange
- Yellow
- Green
- Graphite
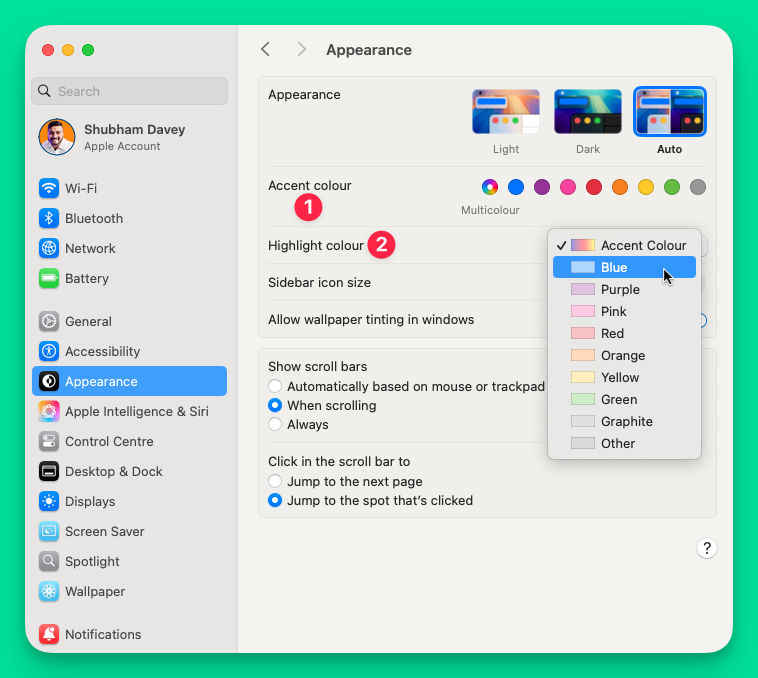
These colors manifest in:
- Button designs
- Menu hover states
- Highlighted text
- Interface control elements
#4.2.3 Change wallpapers
Mac offers extensive wallpaper personalization:
- Option to use personal photos
- Ability to set solid color backgrounds
- Dozens of pre-installed desktop images
- Dynamic wallpapers that change with light/dark modes
Unique Feature: You can even set different wallpapers for light and dark modes, creating a truly dynamic visual experience
Real-Life Scenario: A graphic designer can match their Mac’s appearance to their current project’s mood, switching between minimalist light mode for clean designs and dramatic dark mode for evening work.
#4.3 Trackpad and mouse settings
Apple has hands-down the best trackpad. It’s massive and feature-packed. The trackpad is the deal breaker for me. It’s probably one of the reasons I’ll never use Windows laptops.
The trackpad is so powerful that you would never need an external mouse unless a designer requires a high-precision mouse with a very high DPI.
Here’s everything you can do with the powerful trackpad👇🏻
#4.3.1 Tracking speed adjustment
Imagine you’re a graphic designer or video editor who needs pixel-perfect cursor precision. Mac’s tracking speed settings let you fine-tune pointer sensitivity precisely to your workflow.
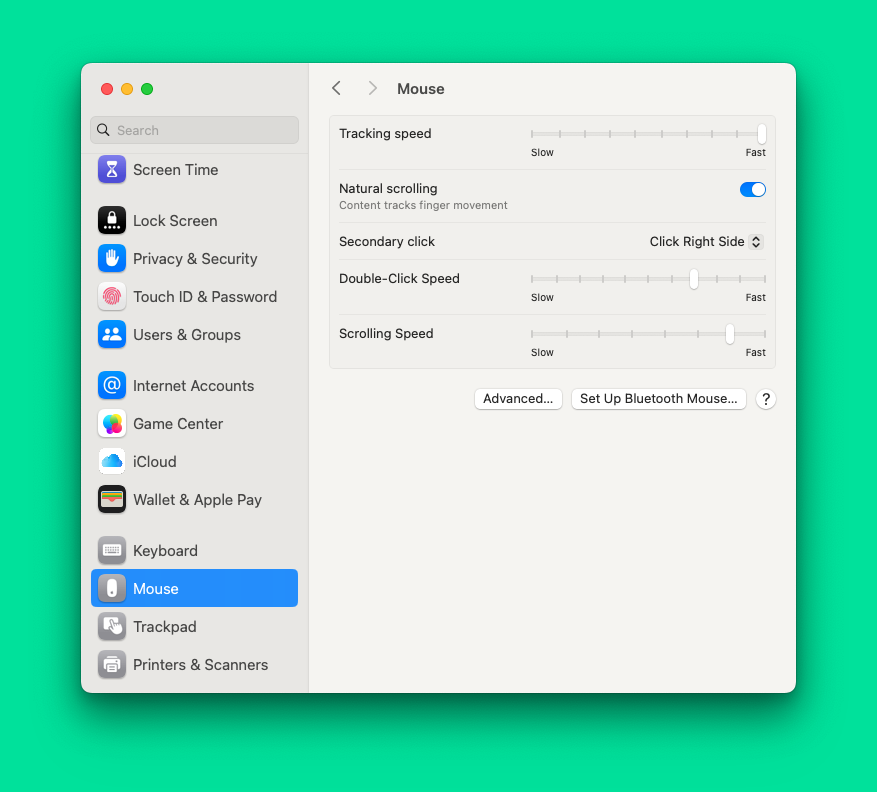
By sliding the tracking speed control, you can:
- Create precise movements for detailed design work
- Make the cursor move lightning-fast for quick navigation
- Customize sensitivity based on screen size & personal preference
#4.3.2 Gesture configuration
Mac trackpads transform computing into an intuitive, gesture-driven experience.
Key gestures include:
- Two-finger pinch to zoom in/out of documents
- Pinch with thumb & three fingers to open Launchpad
- Three-finger swipe to switch between full-screen apps
- Spread your thumb and three fingers to show the desktop instantly
#4.3.3 Button functionality
Customize how clicks work:
- Adjust click pressure sensitivity
- Enable/disable “Force Click” for contextual actions
- Configure secondary click methods (two-finger tap or bottom-right corner click)
#4.3.4 Scrolling direction
Mac offers “Natural Scrolling” mimicking iOS device interactions:
- Content moves in the direction of your finger movement
- Easily switch between natural and traditional scrolling
- Applies consistently across trackpad and mouse
#4.3.5 Tap-to-click options
Control how you interact with your Mac:
- Adjust tap sensitivity
- Enable single-tap to perform mouse clicks
- Reduce physical strain by eliminating manual trackpad pressing
Use Case: A video editor can fine-tune trackpad sensitivity for precise timeline navigation, while a writer might enable natural scrolling for more intuitive document movement.
Pro Tip: For ultimate customization, consider third-party tools like BetterTouchTool, which offer even more advanced gesture and input configurations.
#4.4 Keyboard shortcut configurations
Mac provides robust keyboard customization:
#4.4.1 Create custom keyboard shortcuts
Mac allows the creation of keyboard shortcut customization across system and application levels. You can create shortcuts for:
Personal Workflow Scenarios:
- Add a custom export command in Pages
- Create a shortcut for “New Smart Folder” in Finder
- Add frequently used menu items to quick access in Finder’s sidebar menu
How to create custom shortcuts:
- Open System Settings
- Navigate to Keyboard > Keyboard Shortcuts
- Select “App Shortcuts”
- Choose a specific application or “All Applications”
- Enter the exact menu title
- Define unique key combination
Be careful of:
- Use modifier keys (Command, Option, Control, Shift)
- Each key can be used only once in combination
- Ensure no conflicting shortcuts exist
#4.4.2 Modify existing system shortcuts
Customization Options:
- Disable conflicting system shortcuts
- Reassign default macOS keyboard commands
- Restore default configurations with the “Restore Defaults” option
#4.4.3 App-specific shortcut management
Flexibility Features:
- Create shortcuts within individual applications
- Override default application shortcuts
- Design workflow-specific key combinations
#4.4.4 Accessibility shortcut options
Quick Access Methods:
- Option-Command-F5 for accessibility panel
- Touch ID triple-press on compatible devices
- Customize accessibility feature shortcuts
- Add accessibility controls to the menu bar/Control Centre
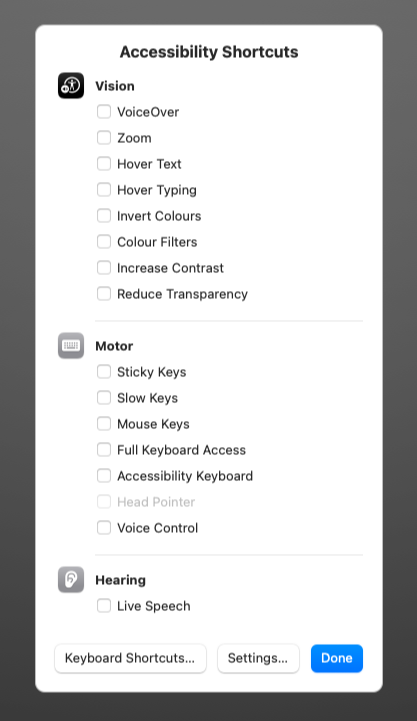
Practical Accessibility Shortcut Examples:
- Quickly toggle VoiceOver
- Activate Zoom functionality
- Switch hearing assistance modes
Practical Example: A programmer can set up complex keyboard shortcuts to streamline coding workflow, reducing repetitive mouse movements and increasing productivity.
#5 File Management and Storage
macOS is probably the best file management system, especially when organizing local files and folders. You can add tags, create smart folders, and add colors for clever management.
Here are more details on organizing your files and folders on macOS.
#5.1 Finder sidebar and folder organization
The Finder sidebar is your navigation hub for quick file access. You can customize it by dragging frequently used folders directly into the sidebar, creating a personalized workflow.
For professionals, this might mean adding project folders, client directories, or frequently accessed work documents. Here’s how you can organize the files and folders for quick access:
- Create Smart Folders that automatically collect documents based on specific criteria
- Customize folder views with multiple display options (Icon, List, Column, Gallery)
- Use tags to categorize files across different locations
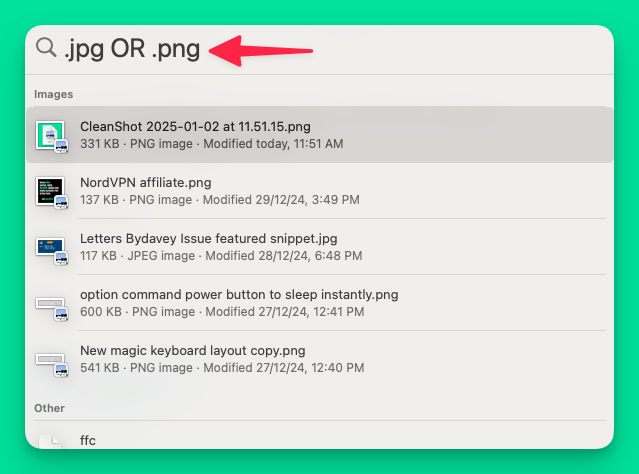
#5.2 Spotlight search functionality
Spotlight transforms file searching from a tedious task to a lightning-fast process. Beyond simple filename searches, you can:
- Find files across your entire system instantly
- Use Boolean logic for precise searches
#5.3 Quick Look Preview feature
Quick Look is a game-changing feature that lets you preview files without opening applications.
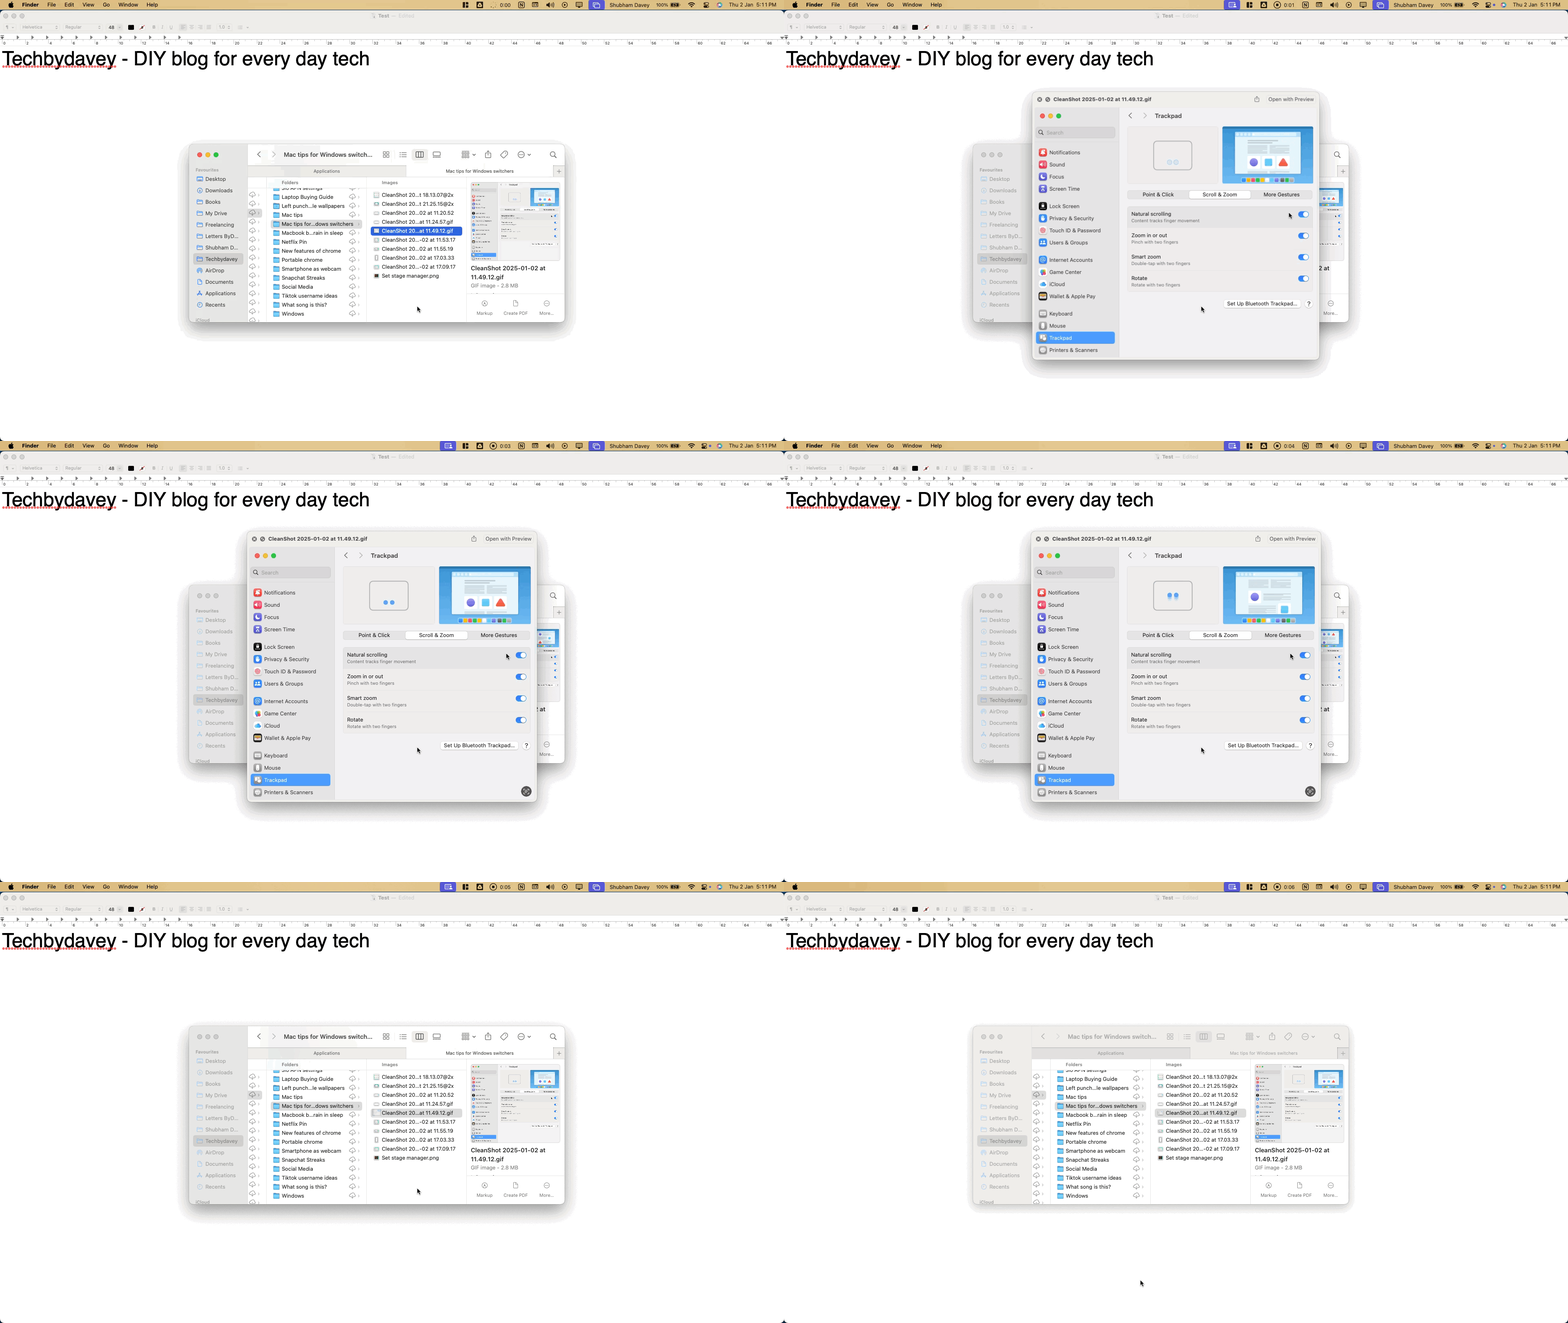
Select a file and press the spacebar to:
- View images, documents, and videos instantly
- Preview multiple files in sequence
- Check file contents quickly
#5.4 Time Machine backup system
Time Machine provides automatic, continuous backup of your entire system.
Key benefits include:
- Hourly backups of recent changes
- Ability to restore the entire system or specific files
- Seamless integration with external drives and network storage
Pro Tip: Configure Time Machine to backup to an external drive or network location, ensuring your data remains safe and recoverable.
#6 App Management
Managing installed applications on your macOS is pretty straightforward. If you install any app from the pp Store, you may need to authenticate the download, especially if you are making a purchase.
However, if you’re installing an application from an external source, it’s pretty straightforward. Open the .dmg file and drag and drop it into the applications folder. That’s it.
#6.1 Installing apps from the App Store
Apps from the Apple App Store are downloaded and installed automatically in the Applications folder. Mac App Store offers a streamlined installation process:
- Open the App Store using Spotlight (Command+Space)
- Search for the desired application
- Click “Get” or the price button
- Authenticate with Apple ID
#6.2 Uninstalling applications
Method 1: From the Finder
- Open Applications folder
- Drag the app icon to Trash or press Command+delete
- Empty Trash to complete removal
Method 2: System Settings
- Click Apple menu
- Select General > Storage
- Select Applications > i icon
- Select the app and click Delete
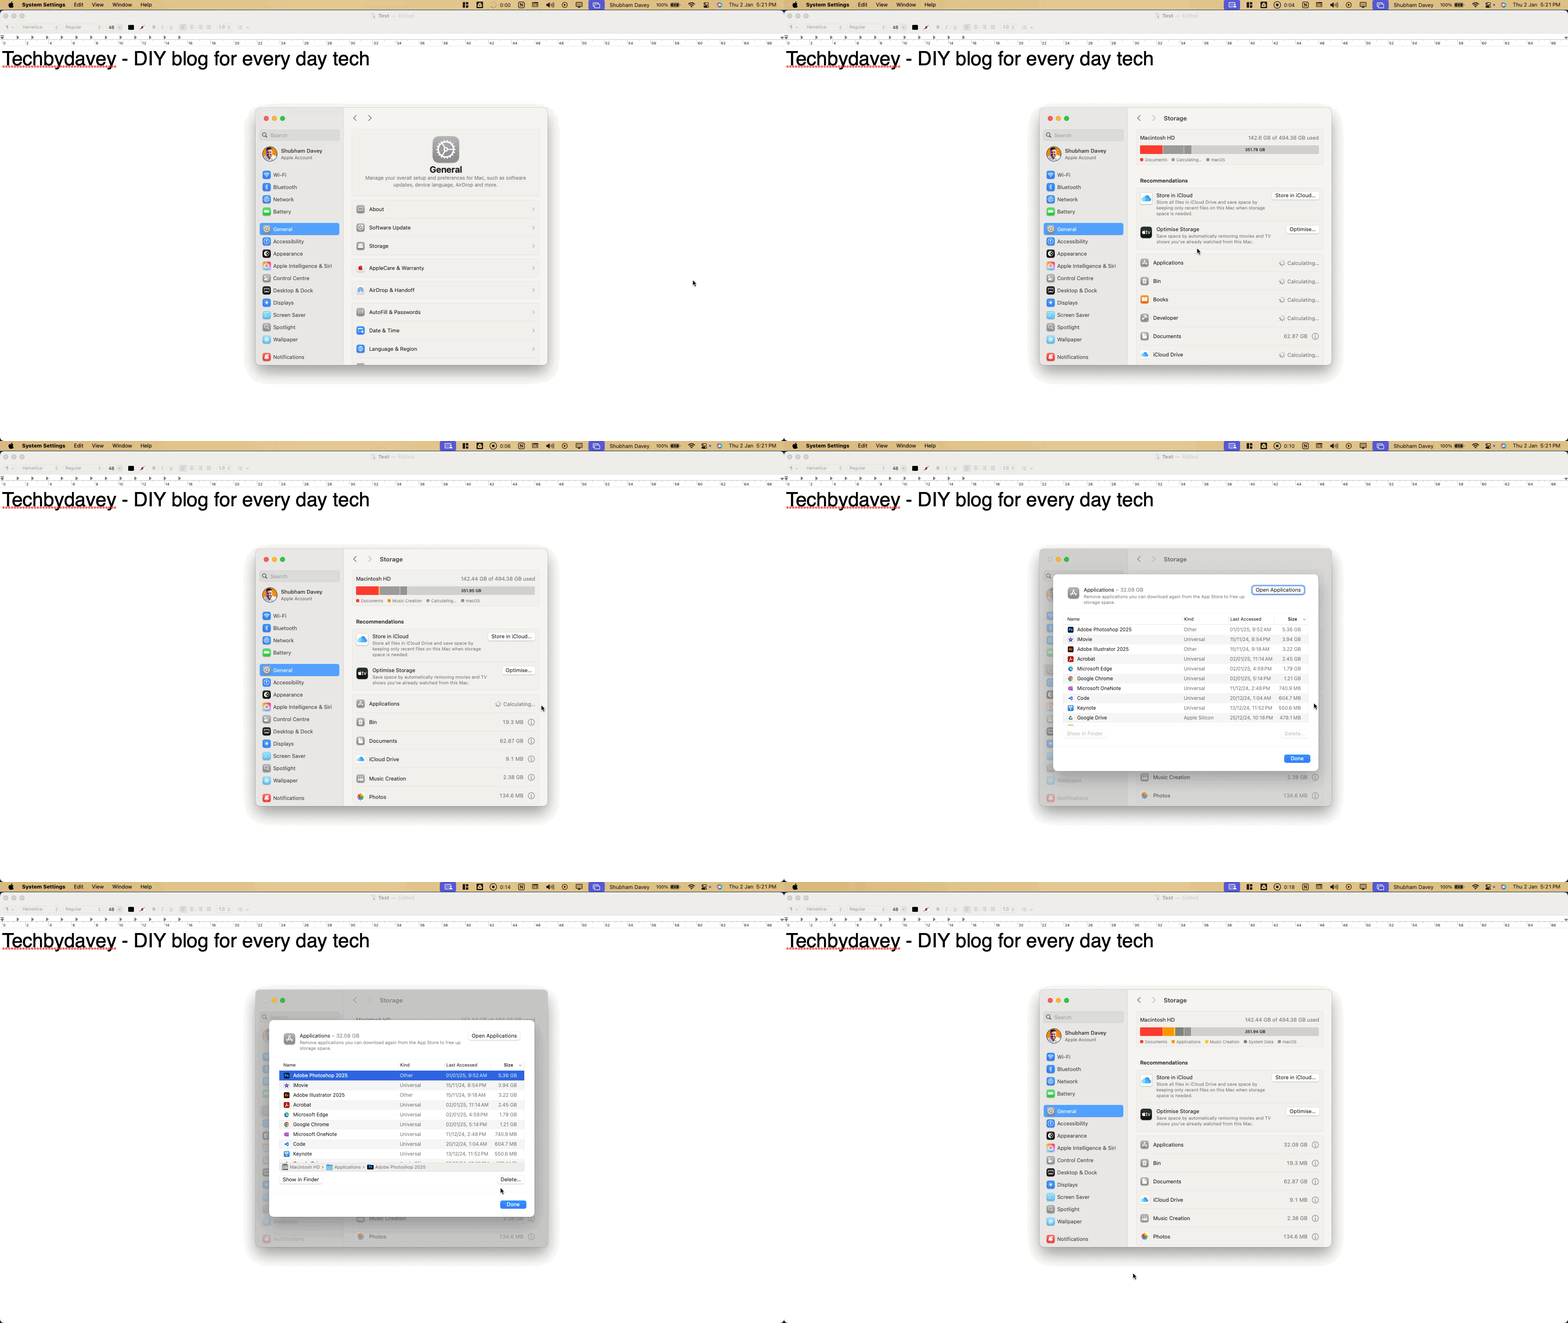
Pro Tip: For complete removal, consider using specialized uninstaller apps that remove associated files.
#6.3 Managing app windows
Unique Mac Window Behaviors
- Closing the window doesn’t quit the app (Command+Q does)
- Minimize to Dock with Command+M
- Use Mission Control for multiple desktop management
- Stage Manager helps organize complex workspace
#6.4 Using Launchpad
Key Features
- Search functionality
- Grid-based app organization
- Create app folders by dragging icons
- Quickly launch applications
- Accessible via Dock icon
Practical Use Cases
- Organize professional vs personal apps
- Quickly search & launch applications
- Create productivity folders
- Manage game collections
Pro Tip: Customize Launchpad by creating themed folders like “Design Tools”, “Productivity”, or “Entertainment”.
#7 Productivity Features
If you’re a productivity freak, macOS is for you.
#7.1 Screenshot and screen recording tools
Mac offers robust built-in tools for capturing your screen:
- Screenshot Toolbar (Command + Shift + 5):
- Allows instant screen captures with multiple options
- Record the entire screen or selected portions
- Capture specific windows
- Immediate annotation capabilities
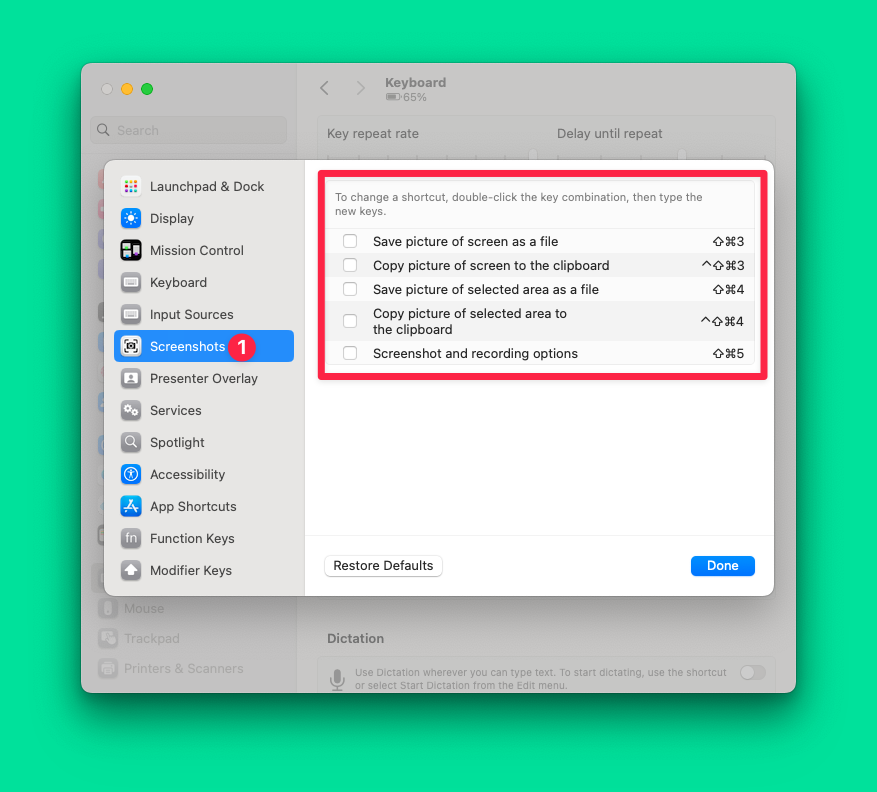
macOS annotations are good but not for my usecase, so I use Cleanshot for annotations,
Real-World Scenario: A designer can quickly capture design iterations, a remote worker can create tutorial videos, or a student can document complex software processes without third-party apps
#7.2 Control Center
Think of the Control Center as your digital command hub:
- Quick access to system settings
- Control music and media playback
- Adjust screen brightness and volume
- Toggle Wi-Fi, Bluetooth, Do Not Disturb
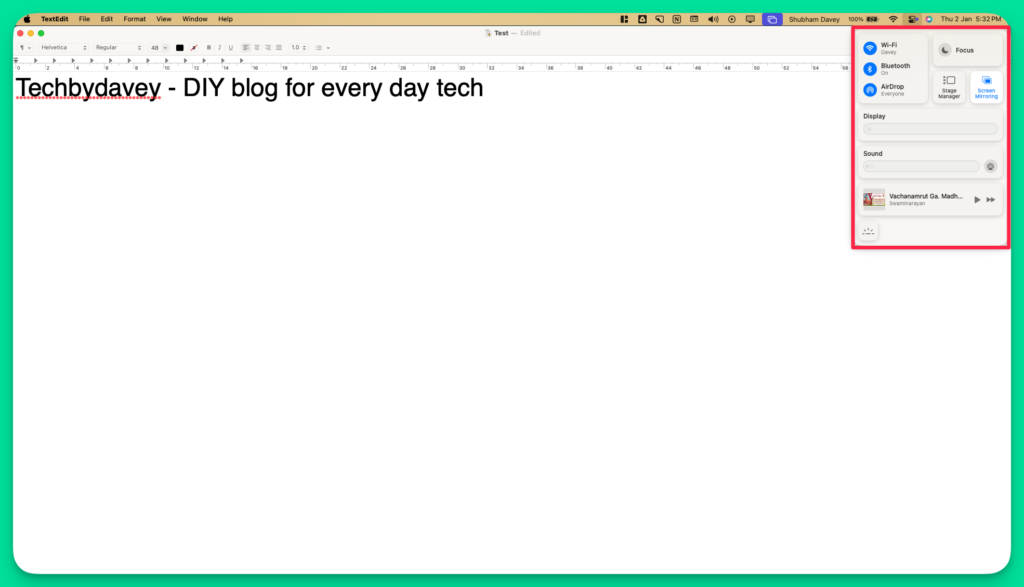
Practical Use: Rapidly manage device settings without diving deep into system preferences, perfect for professionals switching between tasks
#7.3 Notification management
Mac’s notification system offers granular control:
- Group notifications by app
- Set focus modes
- Customize alert styles
- Silence notifications during specific activities
#7.4 Spaces (virtual desktop) functionality
Mac’s virtual desktop feature is a game-changer for any professional:
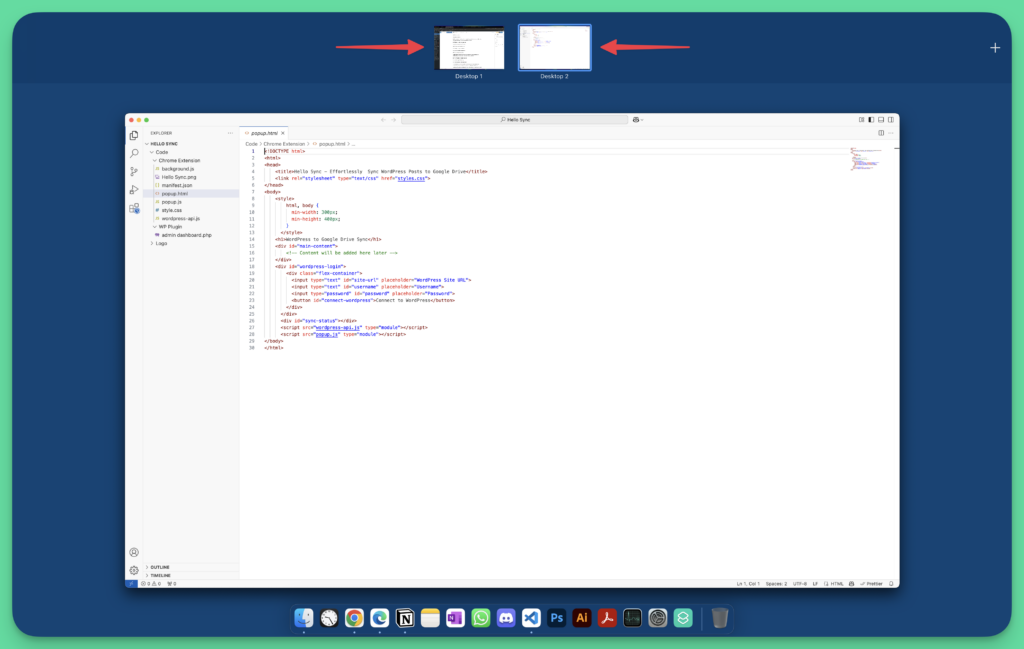
- Create up to 16 virtual screens
- Seamlessly switch between workspaces
- Dedicate each screen to different work contexts
Professional Example: A developer might have:
- Screen 1: Coding environment
- Screen 2: Communication apps
- Screen 3: Web browsers
- Screen 4: Design tools
This approach minimizes clutter and enhances focus.
Final thoughts for new macOS users switching from Windows
Switching to macOS isn’t about mastering every feature overnight—it’s about embracing a new digital landscape with curiosity and patience. What seems complex today will feel intuitive tomorrow.
Think of your Mac as a sophisticated companion, not just a machine. Each interaction reveals something new: a hidden gesture, an unexpected shortcut, a clever system function.
The magic happens when you stop comparing and start exploring.
Don’t be afraid to tap, swipe, and experiment. macOS rewards curious users. Join online Mac communities, watch tutorial videos, and chat with fellow switchers. Your learning curve isn’t a challenge—it’s an adventure.
Remember, every Mac expert was once a beginner who decided to lean into the unknown. Your comfort zone expands with each discovery. Keep playing, keep learning, and most importantly, enjoy the journey.
Your Mac is waiting to surprise you.


