Key Takeaways
- Switching to Mac feels overwhelming with unfamiliar keyboard navigation.
- Mastering just 10-15 core shortcuts can save you hours of productivity each week.
- The learning curve is short, but the productivity gains are massive – turning complex tasks into one-keystroke actions.
Understanding modifier keys on macOS
Mac modifier keys are similar to Windows modifier keys but with some key differences that will help you transition smoothly. Think of them as the control panel for quick actions and system navigation.
Here are all the modifier keys you will see on your MacBook’s keyboard or any keyboard designed for macOS.
- Command (⌘): The primary modifier key on macOS for keyboard shortcuts. Used to perform actions like copy (Command-C), paste (Command-V), and many other system-level functions. It’s equivalent to the Control key on Windows.
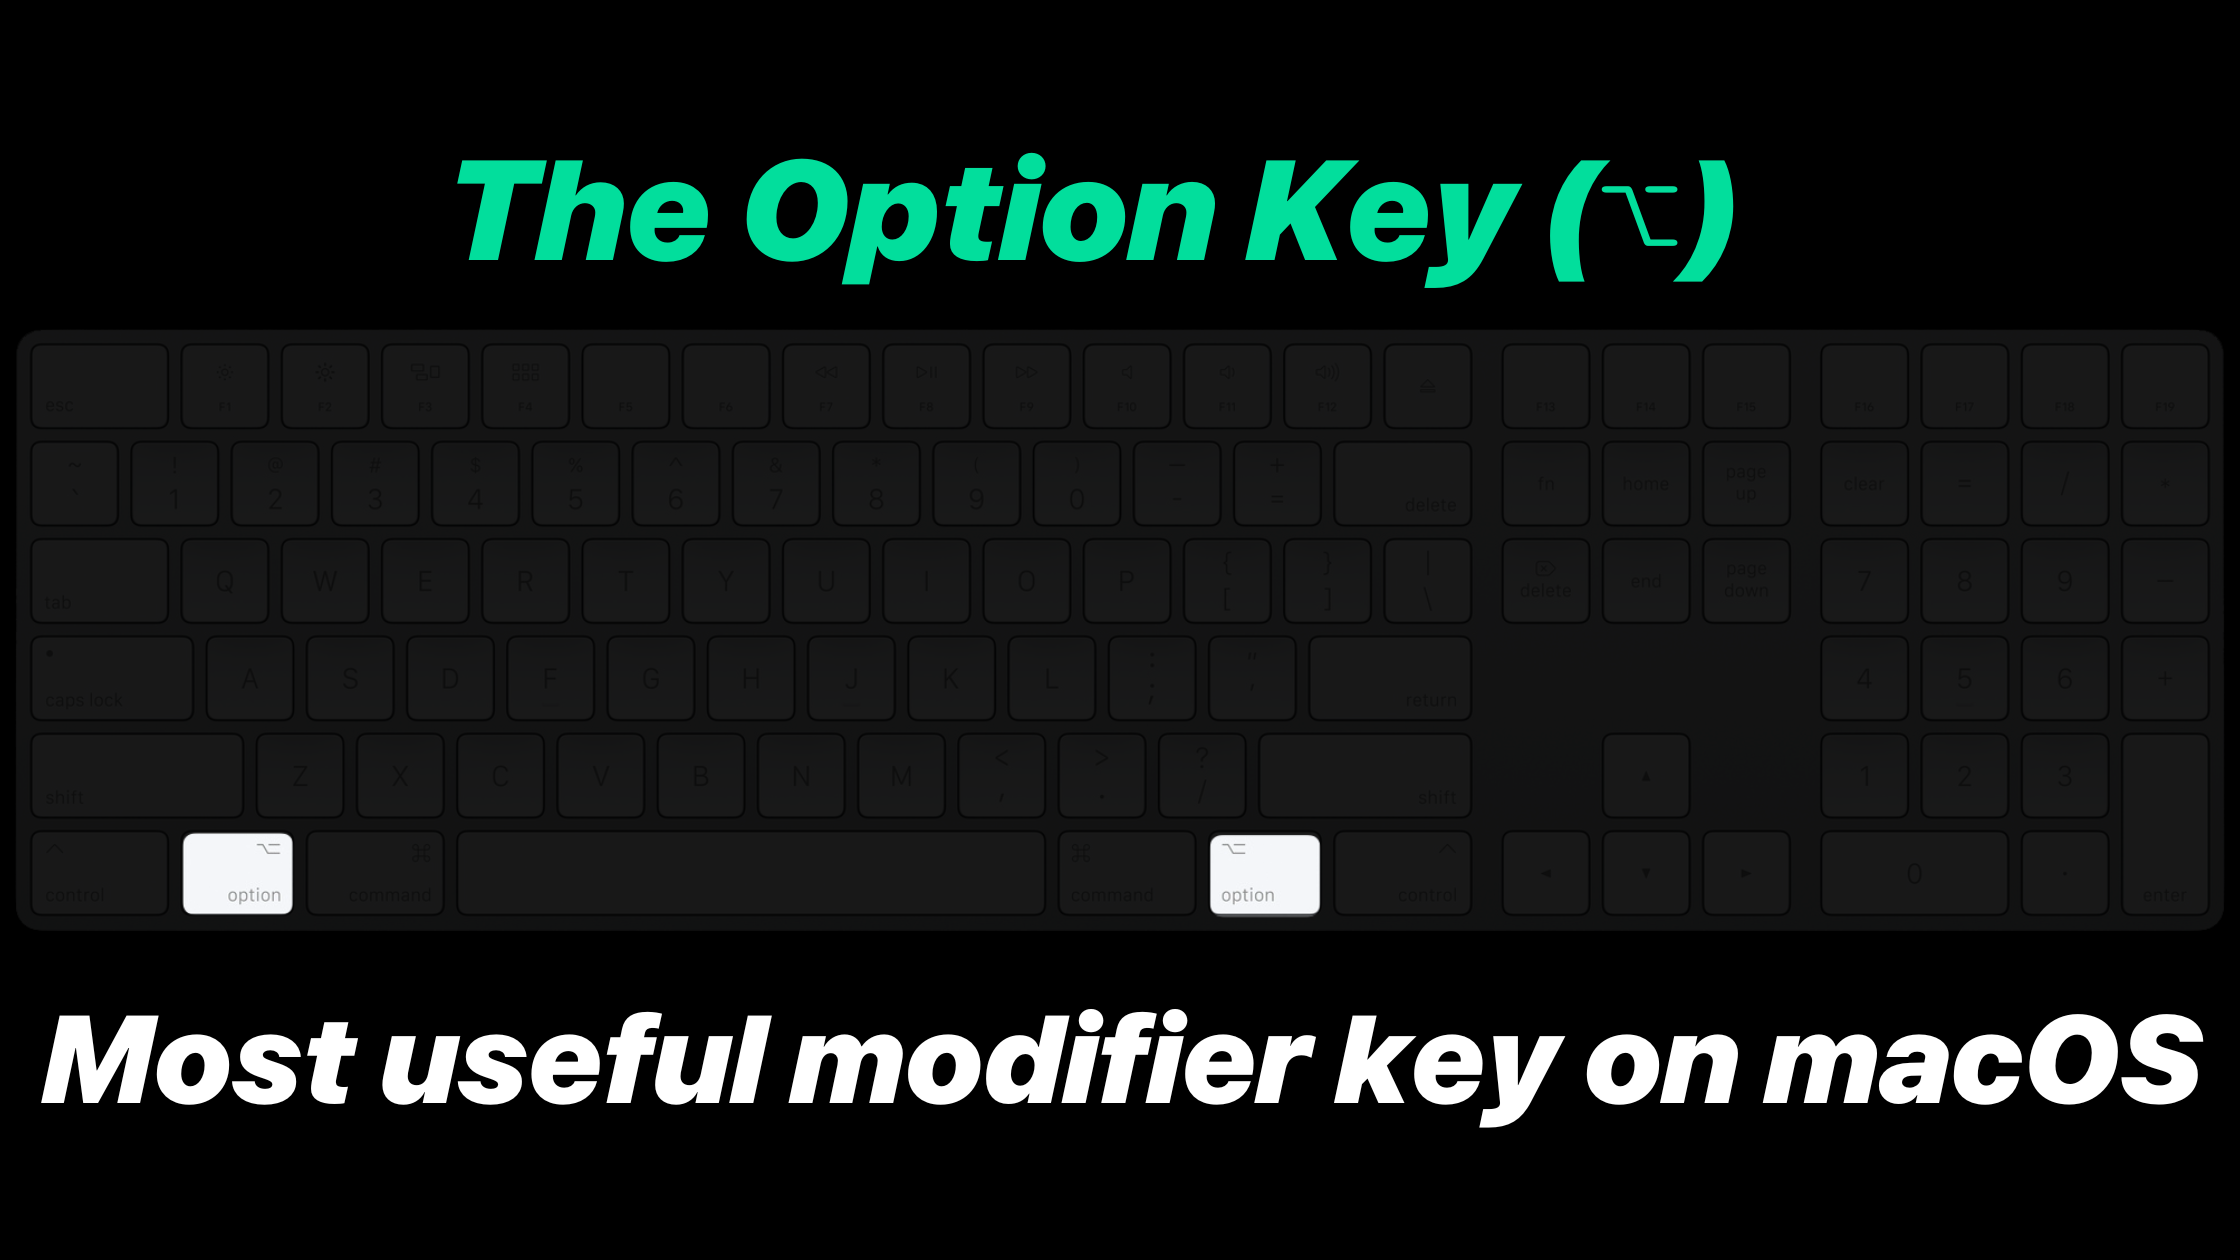
- Option (⌥): Also known as the Alt key, this modifier is used to access alternative functions and create special characters. For example, Option-Shift-8 creates the degree symbol (°).
- Control (⌃): It is less frequently used than Command, but it is still essential for specific functions like bringing up context menus and some system-level shortcuts.
- Shift (⇧): Used for capitalizing letters, selecting multiple items, and creating alternative versions of keyboard shortcuts.
- Function (fn): Primarily found on laptop keyboards, this key activates secondary functions on function keys, such as adjusting screen brightness or volume.
- Caps Lock (⇪): Traditionally used to type in all capital letters. However, in macOS, it can be customized to perform other functions, such as acting as an additional modifier key and custom shortcut along with other keys.
Unique Modifier Key Features
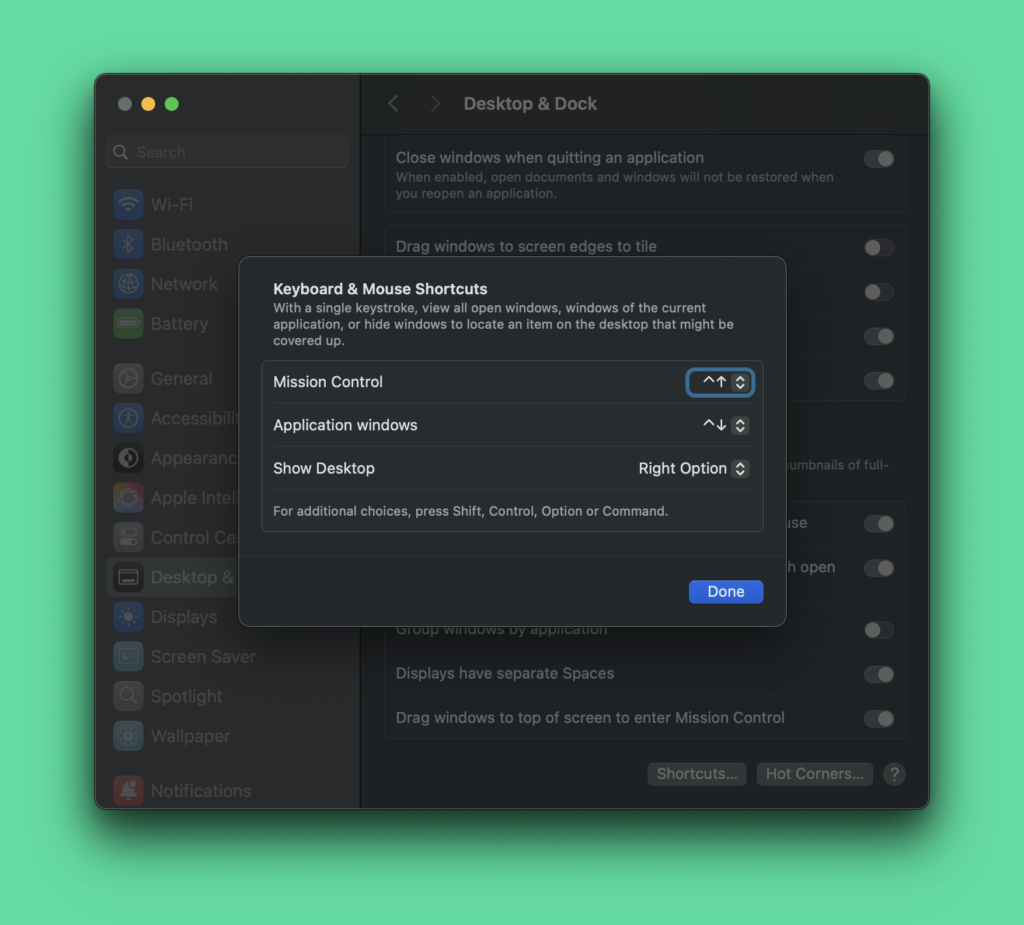
Interestingly, macOS now supports Modifier-Only Activation in recent versions. This means pressing a modifier key briefly can trigger specific actions, such as showing the desktop or launching dictation.
in macOS Sequoia (2024), Apple expanded this functionality to include modifier-only keys that can activate shortcuts like ‘Show Desktop’. This now includes Left and Right Command, Option, Shift, one Control, and the Function (fn) key, effectively providing 9 extra shortcut activation methods.
To control these shortcuts, navigate to System Settings > Desktop & Dock > Shortcuts button (scroll at the bottom).
You can press & hold Shift, Control, Option or Command while choosing the shortcuts. This comes handy when the default combination is assigned to other application.
Customizing Modifier Keys on macOS
Users can modify the behavior of these keys in System Settings > Keyboard > Keyboard Shortcuts > Modifier Keys.
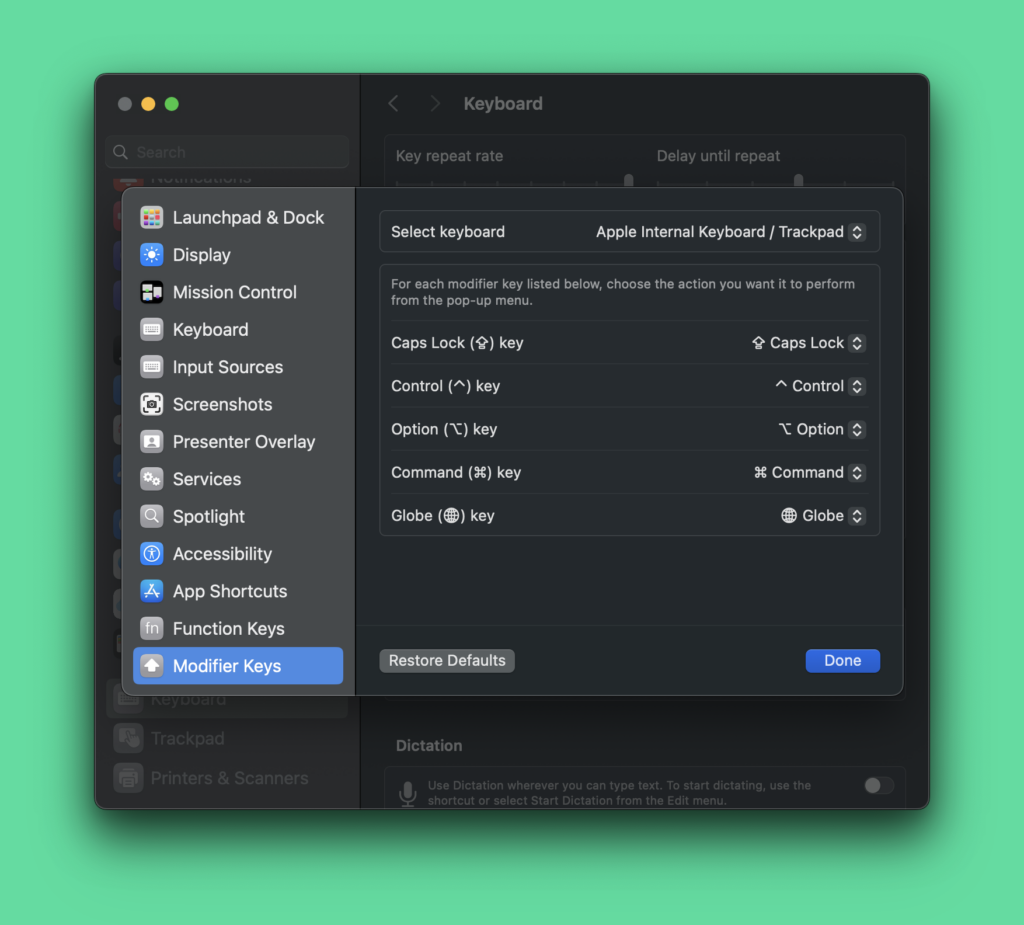
This allows for personalized key mappings, such as changing Caps Lock to function as a Control key or completely disabling it.
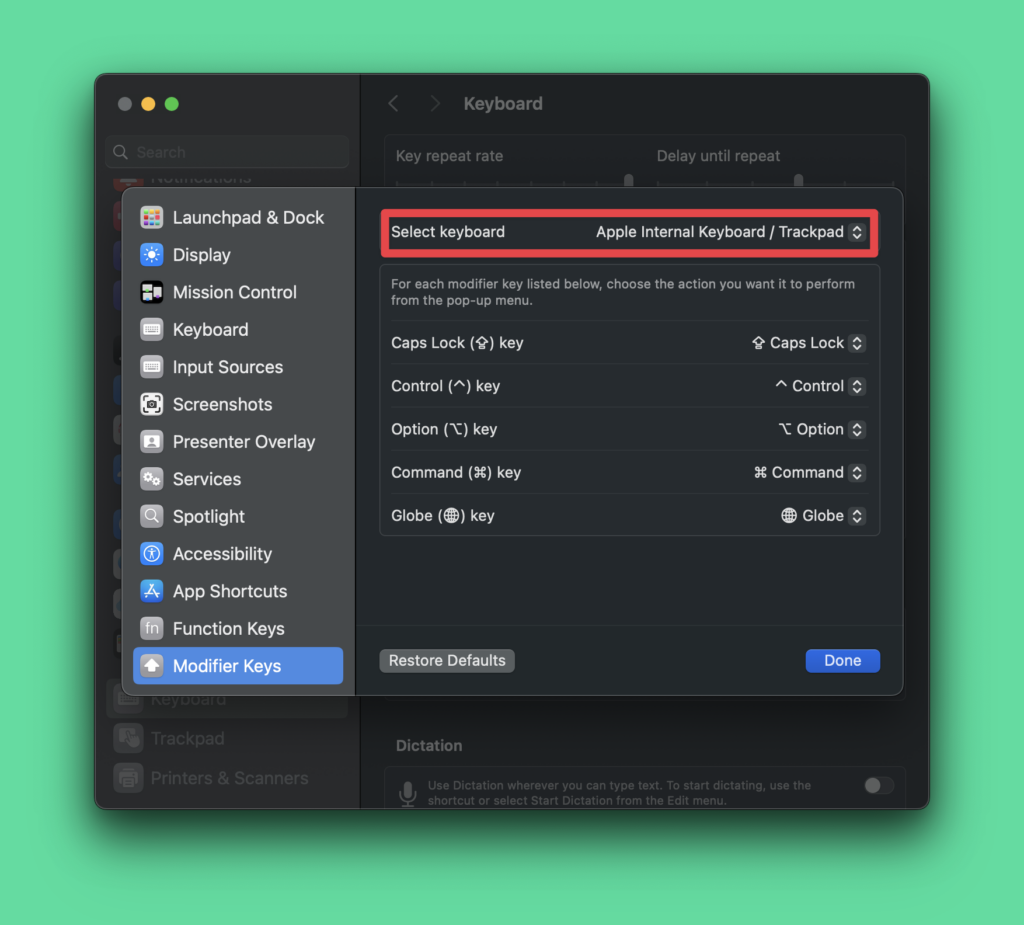
This is useful for keyboards that aren’t designed for macOS. You can select the keyboards connected to your MacBook and customize the modifier keys only for that keyboard.
Common macOS Keyboard Shortcuts You’d Be Using
#1 Basic System Shortcuts
Command-C: Copy selected items. Imagine you’re working on a report and want to copy a paragraph of text to use elsewhere – just select and press Command-C.
Command-V: Paste copied content. After copying that paragraph, you can paste it into another document instantly.
Command-X: Cut selected items. Perfect when you want to move text from one location to another in a document.
Command-Z: Undo your last action. Did you accidentally delete something? This shortcut brings it right back.
Command-A: Select all items in the current window or document. Useful when you want to copy or format an entire document at once.
Command-F: Find text in active application window. Usually works with docs and webpages.
Command-G: Find again or find next occurrence of the searched item. Press Shift+Command+G to find navigate the occurrences in reverse.
Command-O: Open files in supported applications. For example, in Photoshop, pressing Command-O will open Finder to open image files to edit & use in Photoshop. In finder, pressing Command-O will open the file in the default application. Alternatively, use Command+Down arrow to open selected files in Finder app.
Command-P: Opens the print document menu in pretty much any applications that contain printable data/information.
Command-S: Saves the document/file in respective application. While on webpages, this shortcuts opens Finder to save the webpage as HTML and in some web applications like WordPress editor, it saves the changes in the post.
Command-D: Duplicate the selected files in Finder. On most browsers, this shortcut will save the active tab as bookmark.
Command-E: Eject the selected disk or volume in Finder application. You won’t find the eject button on your MacBook but in magic keyboards.

Command-F: Start a Spotlight search in the Finder window. This helps quickly find files and folder.
Command-I: Show the Get Info window for a selected file in the Finder. Alternatively, enable preview pane and scroll down to view basic details about the selected file/folder.
Command-R: In some apps, such as Calendar or Safari, refresh or reload the page. In Software Update, check for software updates again.
Shift-Command-C: Open the Computer window in Finder. This is the default SSD location on your Mac.
Shift-Command-D: Open the desktop folder in Finder. You can also pin the Desktop or add desktop to Dock.
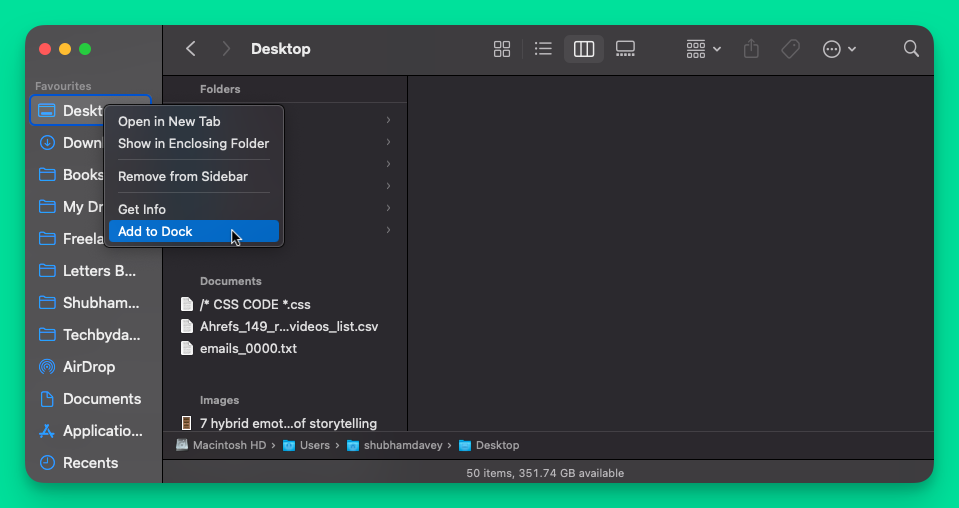
Shift-Command-F: Open the Recents window, showing all of the files you have viewed or changed recently.
Shift-Command-G: Open a Go to Folder window to jump to specified folder.
Shift-Command-H: Open the Home folder of the current macOS user account.
Shift-Command-I: Open iCloud Drive folder in Finder.
Option-Command-L: Open the Downloads folder in the active window of browser.
Shift-Command-N: Create a new folder in Finder and Incognito in browsers.
Shift-Command-O: Open the Documents folder. Just like Desktop, you can pin the Documents folder in Finder as Favourites.
Shift-Command-P: Show or hide the Preview pane for all view types in Finder windows. This applies only to the active Finder window, not all the Finder windows. Works well when you’ve disabled the sidebar.
Shift-Command-R: Open the AirDrop window. You can add Airdrop option in control center as well.
Shift-Command-T: Show or hide the tab bar in Finder windows. This helps see the folder you’re viewing the files in. By default this is disabled.
Control-Shift-Command-T: Add selected Finder item to the Dock.
Shift-Command-U: Open the Utilities folder. Alternatively, press command+spacebar to access spotlight and then search for the app.
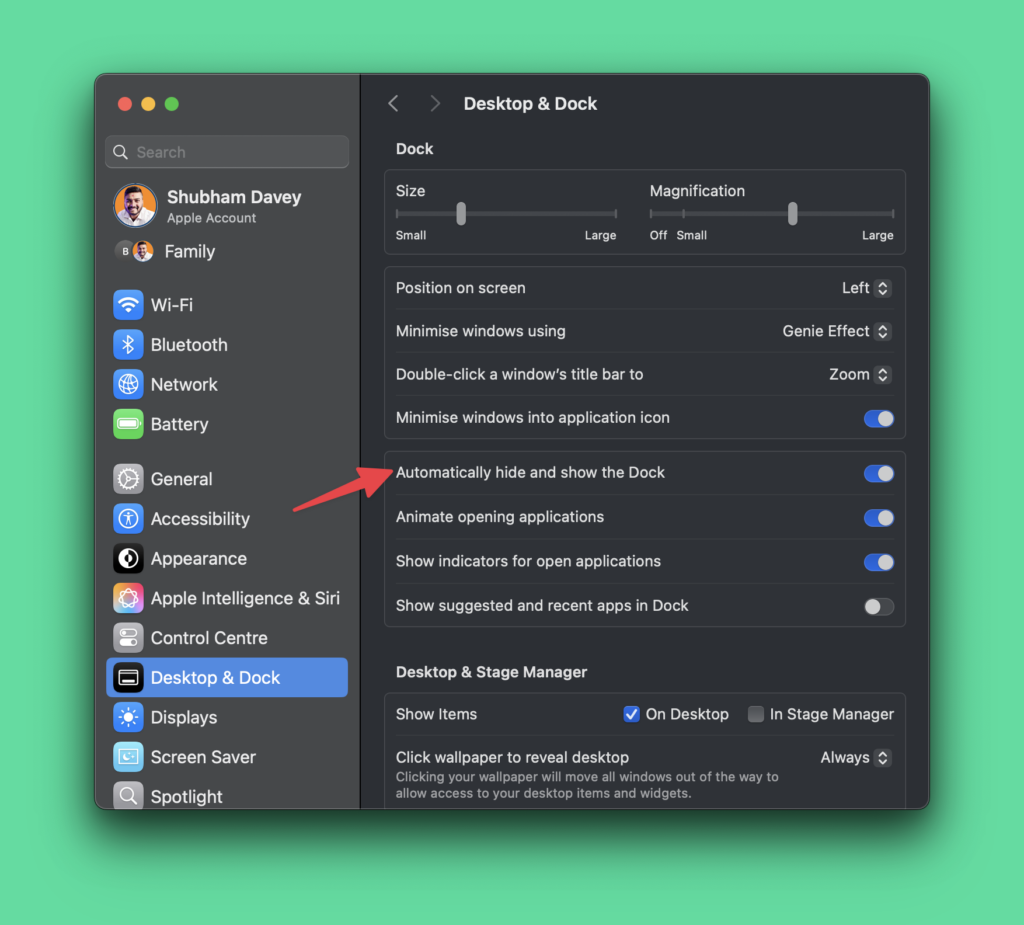
Option-Command-D: Show or hide the Dock. You can enable/disable this setting in > System Settings > Desktop & Dock
Control-Command-T: Add the selected item to the sidebar (OS X Mavericks or later).
Option-Command-P: Hide or show the path bar in Finder windows.
Option-Command-S: Hide or show the Sidebar in Finder windows.
Command-Slash (/): Hide or show the status bar in Finder windows.
Command-J: Show View Options for the selected Folder from the sidebar in Finder.
Command-K: Open the Connect to Server window. Works well for connecting to local networks.
Control-Command-A: Make an alias (same as shortcut in Windows) of the selected item in Finder.
Option-Command-N: Create a new Smart Folder.
Option-Command-T: Show or hide the toolbar when a single tab is open in the current Finder window.
Option-Command-V: Move the files in the Clipboard from their original location to the current location.
Command-Y: Use Quick Look to preview the selected files. Pressing spacebar does the same thing and is more convenient.
Option-Command-Y: View a Quick Look slideshow of the selected files. Game changer for daily use and way better than previewing using Spacebar.
Command-1: Enable the icon view in Finder window.
Command-2: Enable the list view in Finder window.
Command-3: Enable the column view in Finder window.
Command-4: Enable the gallery view in Finder window.
Command-Up Arrow: Open the folder that contains the current folder. Alternatively, use Command-[ to go to previous folder.
Command-Control-Up Arrow: Open the folder that contains the current folder in a new window.
Command-Down Arrow: Open the selected item, alternatively press command-O
Right Arrow: Open the selected folder. This only works when in list view.
Left Arrow: Close the selected folder. This only works when in list view.
Command-Delete: Move the selected item to the Bin.
Shift-Command-Delete: Empty the Bin. This shortcut works in any active Finder window.
Option-Shift-Command-Delete: Empty the Bin without confirmation dialogue.
Command-Brightness Down: Turn video mirroring on or off when your Mac is connected to more than one display.
Option-Brightness Up: Open Displays preferences. This works with either Brightness key.
Control-Brightness Up or Control-Brightness Down: Change the brightness of your external display, if supported by your display.
Option-Shift-Brightness Up or Option-Shift-Brightness Down: adjust the display brightness in smaller steps. Add the Control key to this shortcut to make the adjustment on your external display, if supported by your display.
Option-Mission Control: Open Mission Control preferences.
Command-Mission Control: Show the desktop.
Control-Down Arrow: Show all windows of the front app.
Option-Volume Up: Open Sound preferences. This works with any of the volume keys.
Option-Shift-Volume Up or Option-Shift-Volume Down: Adjust the sound volume in smaller steps.
Option-Keyboard Brightness Up: Open Keyboard preferences. This works with either Keyboard Brightness key.
Option-Shift-Keyboard Brightness Up or Option-Shift-Keyboard Brightness Down: Adjust the keyboard brightness in smaller steps.
Option key while double-clicking: open the item in a separate window, then close the original window.
Command key while double-clicking: open a folder in a separate tab or window.
Command key while dragging to another volume: Move the dragged item to the other volume, instead of copying it.
Option key while dragging: Copy the dragged item. The pointer changes while you drag the item.
Option-Command while dragging: make an alias of the dragged item. The pointer changes while you drag the item.
Option-click a disclosure triangle: Open all folders within the selected folder. This only works when in list view.
Command-click a window title: See the folders that contain the current folder.
#2 Navigation and Window Management Shortcuts
Command-Tab: Switch between open applications quickly. Great for multitasking between your email and work document.
Command-H: Hide the current application’s windows. Instantly clear your screen when someone walks by.
Command-M: Minimize the current window to the Dock. Quickly declutter your workspace.
Command-W: Close the current window. Efficiently close documents or browser tabs.
Control-Command-F: Enter full screen on applications if supported by the application.
Command-`: Switch between multiple windows of same applications.
Command-T: Open new tabs in supported applications like browsers and Finder.
Option-Command-Left/Right Arrow: Navigate through various tabs in web browsers like Google Chrome, Safari & Edge. Most tab based application will support this shortcut. I checked with the Native Notion app & this works.
Command-Sqaure brackets: While browsing webpages on Chrome or Safari, Command-[ takes you to backward and Command-] takes to forward. This shortcut works in the Finder as well.
Command-,: This shortcut opens preferences page of the active application window. This shortcut works in almost all applications.
#3 Finder and File Management Shortcuts
Command-N: Open a new Finder window. Quickly access another folder without cluttering your desktop.
Command-Shift-N: Create a new folder instantly. Perfect for organizing files on the fly.
Command-Delete: Move selected items to the Trash. A quick way to remove unwanted files.
Command-Shift-Delete: Empty the Trash without confirmation. Quickly clear out unnecessary files.
#4 Document and Text Editing Shortcuts
Command-B: Bold selected text. Emphasize important points in your document instantly.
Command-I: Italicize selected text. Add stylistic emphasis to your writing.
Command-U: Underline selected text. Highlight key information quickly.
Option-Delete: Delete the entire word to the left of the cursor. Quickly remove entire words instead of characters.
Command-Left/Right Arrow: Move the cursor to the beginning or end of the current line. Navigate text efficiently.
#5 Accessibility Shortcuts
Option-Command-F5: Open Accessibility Shortcuts panel. Quickly enable vision or hearing assistance features.
Control-Option-Command-8: Invert screen colors. Helpful for users with visual impairments or in low-light conditions.
Command-Option-Plus/Minus: Zoom in and out. Quickly adjust the screen magnification.
#6 System Control Shortcuts
Power Button: Turn on the Mac or put it to sleep. Quick system management.
Control-Command-Power Button: Force restart your Mac. Useful when the system freezes.
Command-Control-Q: Lock your screen immediately. Secure your computer in seconds.
#7 Screenshot Shortcuts
Shift-Command-5: Open screenshot and screen recording tools. Capture your screen with ease.
#8 Emoji and Special Character Shortcuts
Control-Command-Space: Open the Emoji and Symbols viewer. Quickly insert fun or specialized characters.
Option-Shift-8: Insert degree symbol. Perfect for scientific or temperature-related documents. You can do a lot more than this with the Option key. Here’s the full list of option key shortcuts on macOS.
How to Create Custom Keyboard Shortcuts?
The best part of macOS is assigning custom shortcuts for pre-installed applications and third-party apps as well.
Here’s how to create custom shortcuts on macOS:
Step 1: Navigate to > System Settings
Pro Tip: use option+shift+K for
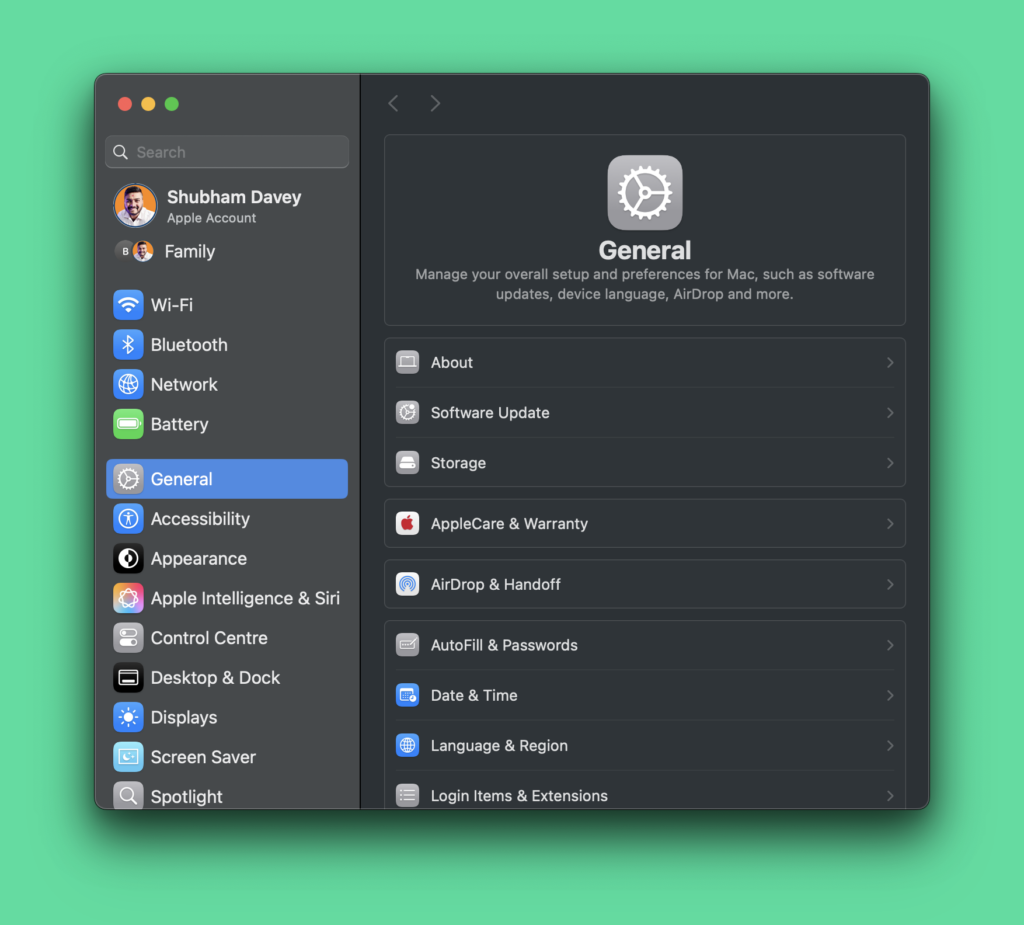
Step 2: Scroll down and find Keyboards
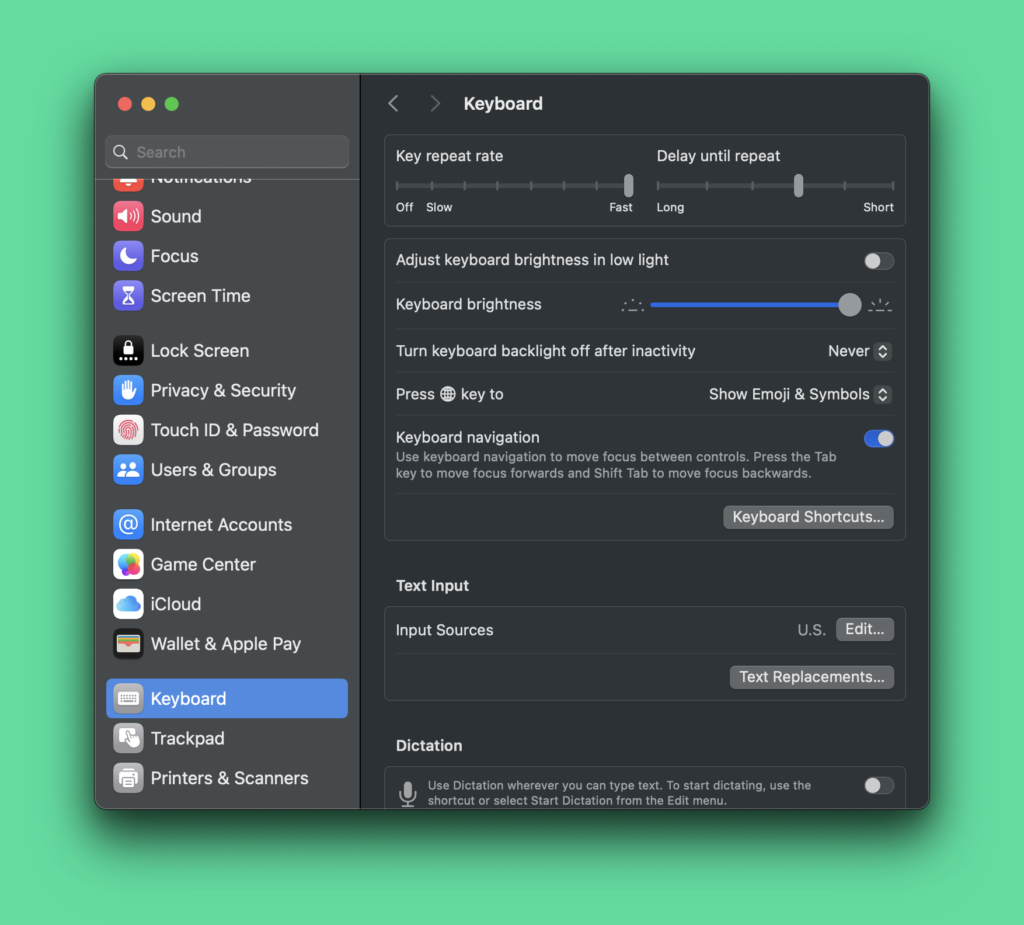
Step 3: Click on Keyboard Shortcuts button
You’ll see all the keyboard shortcuts for various use cases in the next window.
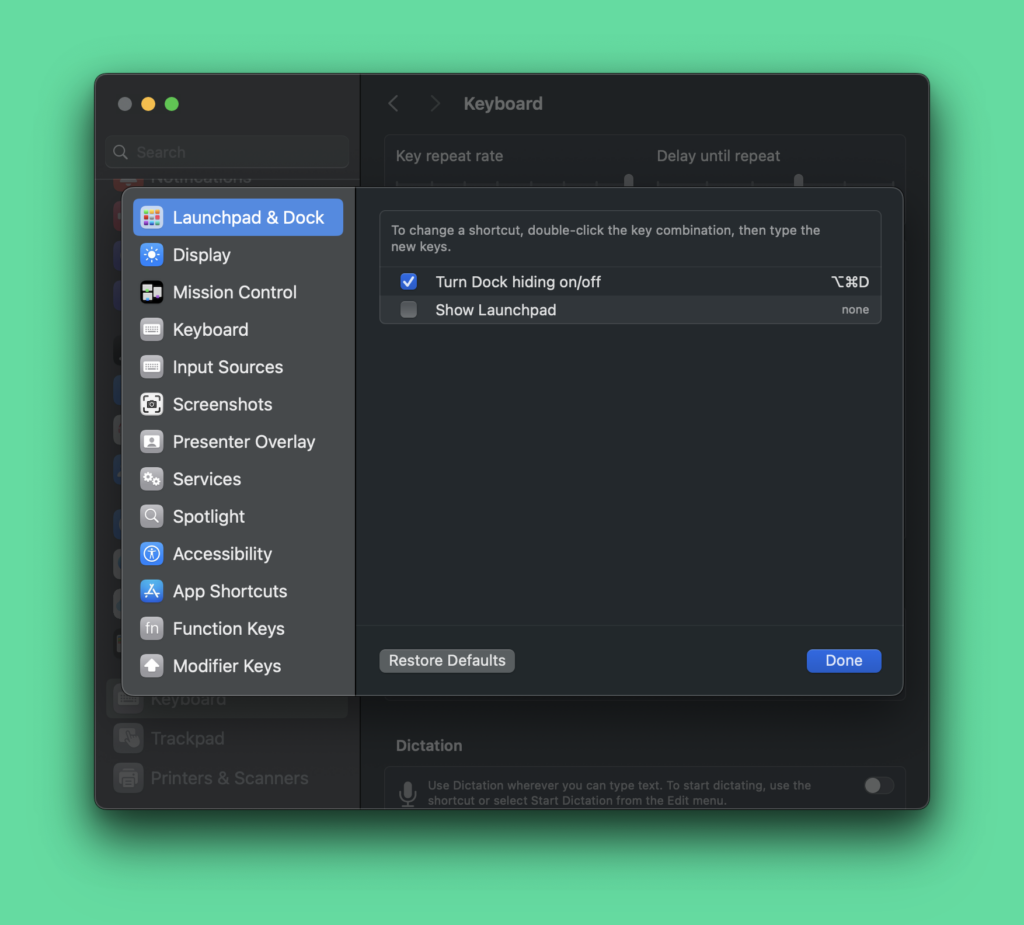
Step 4: Click on App Shortcuts in the left navigation
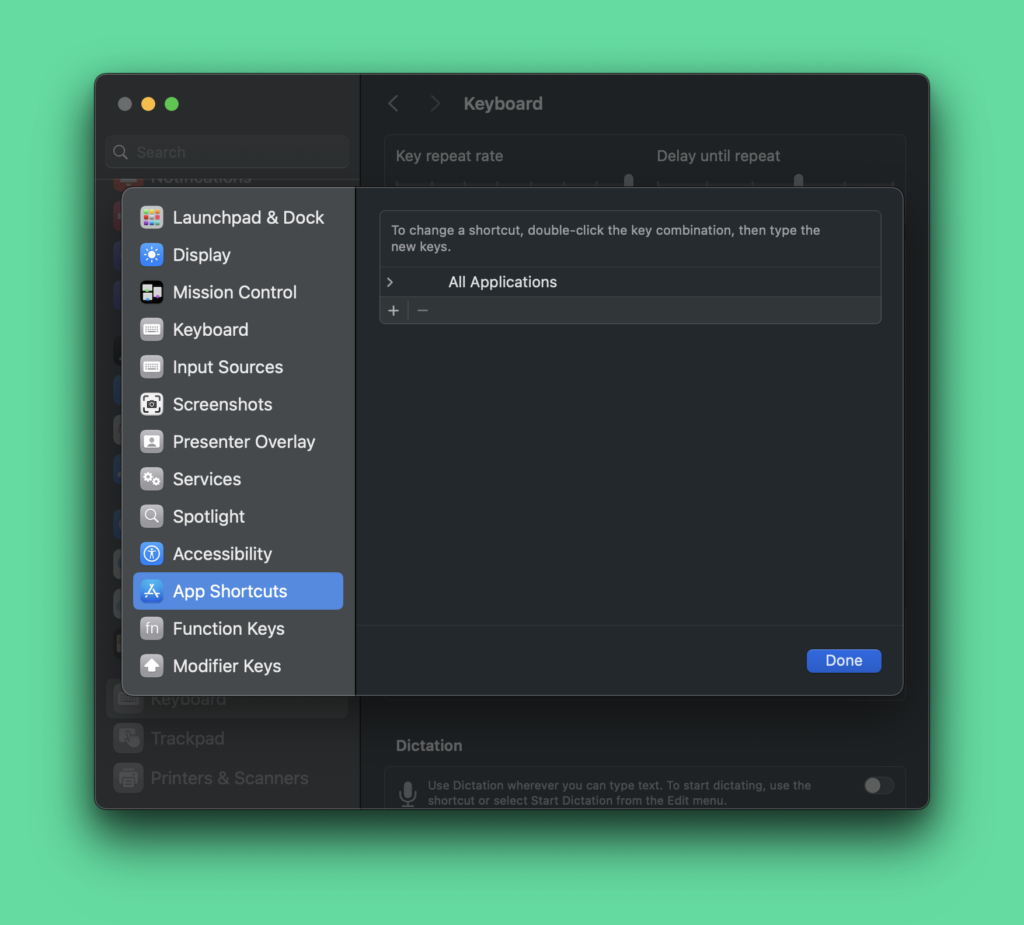
Step 5: Click on + icon to select the installed application
You can choose to apply the shortcut across macOS, that is the shortcut will be universal like ⌘+C & ⌘+V. But this step is about creating custom shortcuts for specific apps. So select the installed application from the drop down.
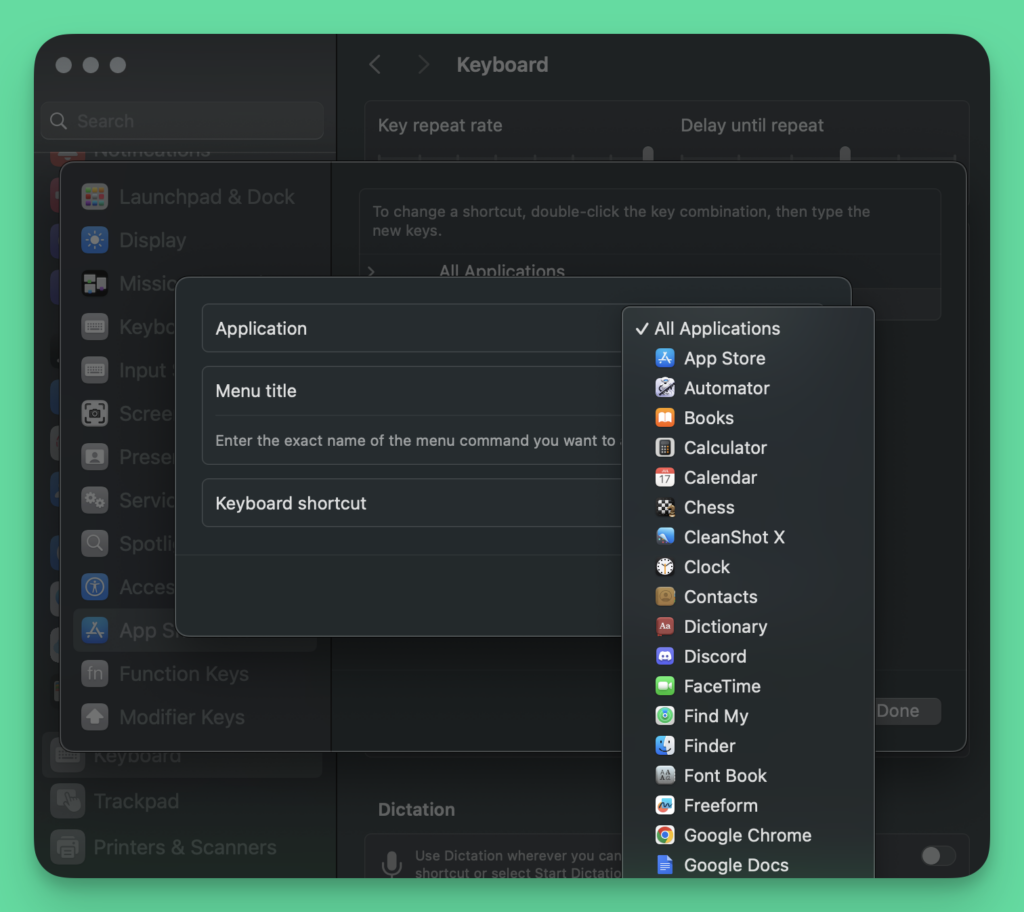
Step 6: Add recognizable title and type the shortcut
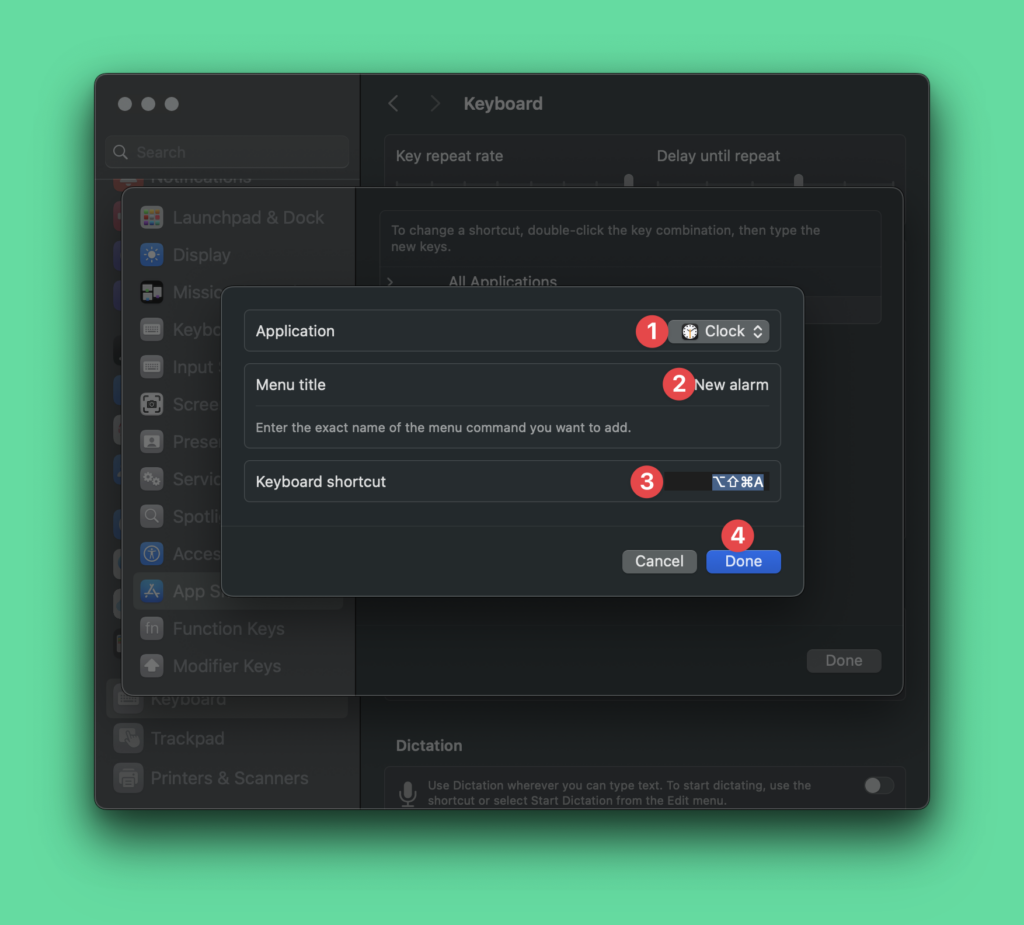
Step 7: Click on Done
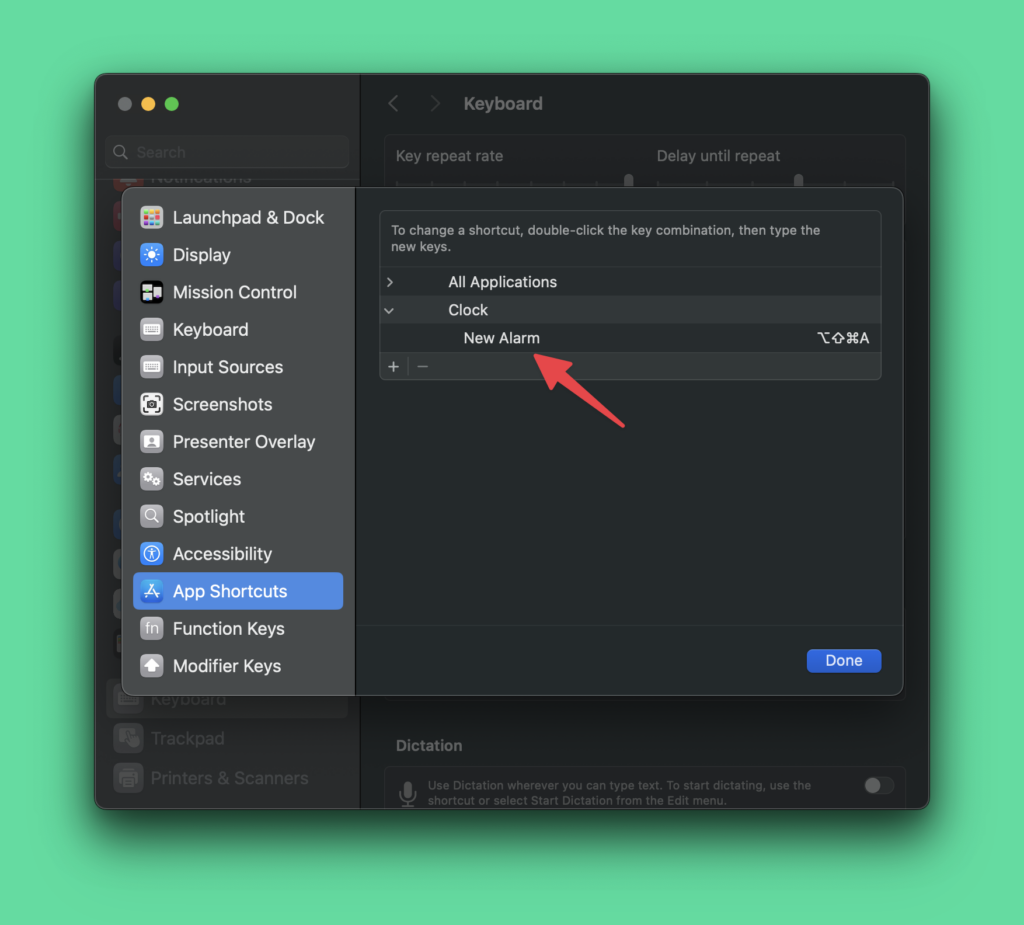
You will see the custom keyboard shortcuts listed as shown below.
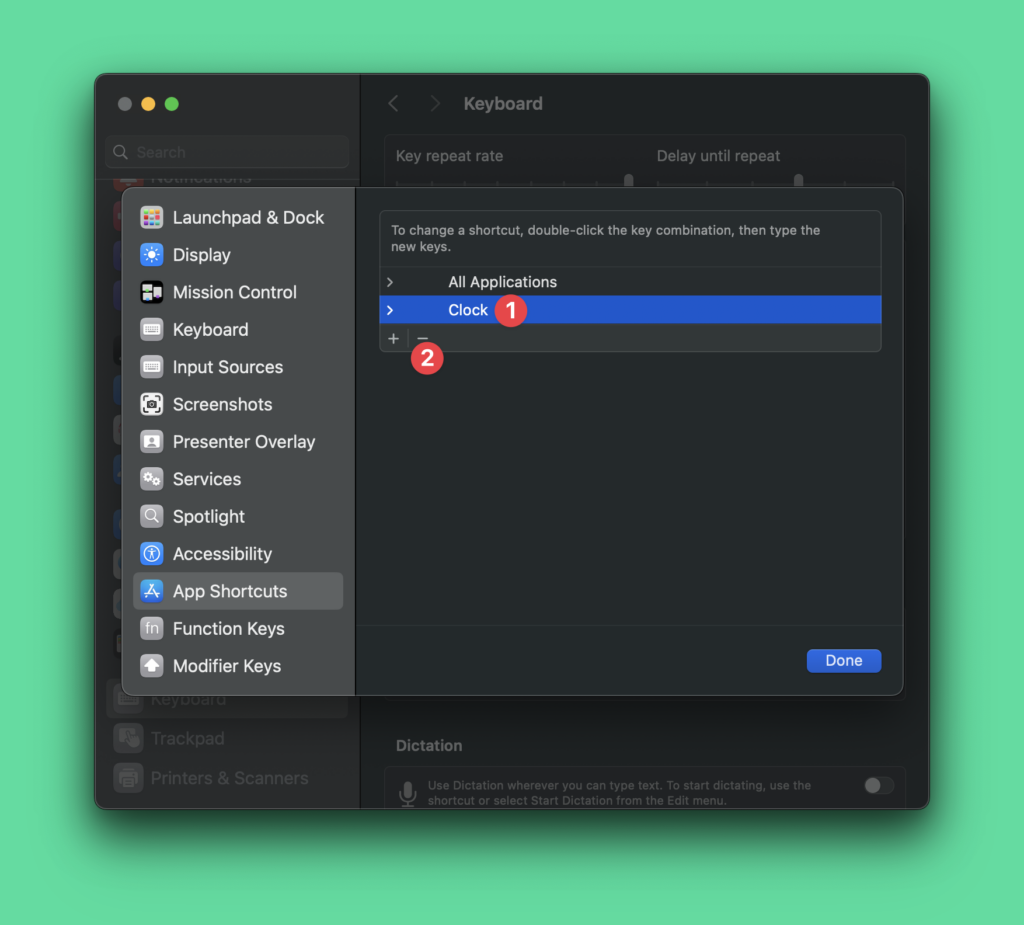
To delete a shortcut, click on the Application name and then click on -. The shortcut will be deleted. Click on Done to save changes.
Frequently Asked Questions
#1 How do I customize keyboard shortcuts on Mac?
Go to Apple menu > System Settings > Keyboard > Keyboard Shortcuts. Select a category, then modify or create new shortcuts.
#2 Can I use Windows keyboard shortcuts on a Mac?
No. Mac uses different modifier keys: Command (⌘) instead of Ctrl, Option (⌥) instead of Alt.
#3 What if a keyboard shortcut doesn’t work in an app?
Check the app’s menu bar for correct shortcut. Keyboard layouts can vary by language and app.
#4 Are Mac keyboard shortcuts universal across applications?
Many shortcuts are universal, like Command+C for copy, but some are app-specific.
#5 How quickly can I learn Mac keyboard shortcuts?
Practice regularly. Most users become proficient within a few weeks of consistent use.

